Ways to Approach Assessment in the Arts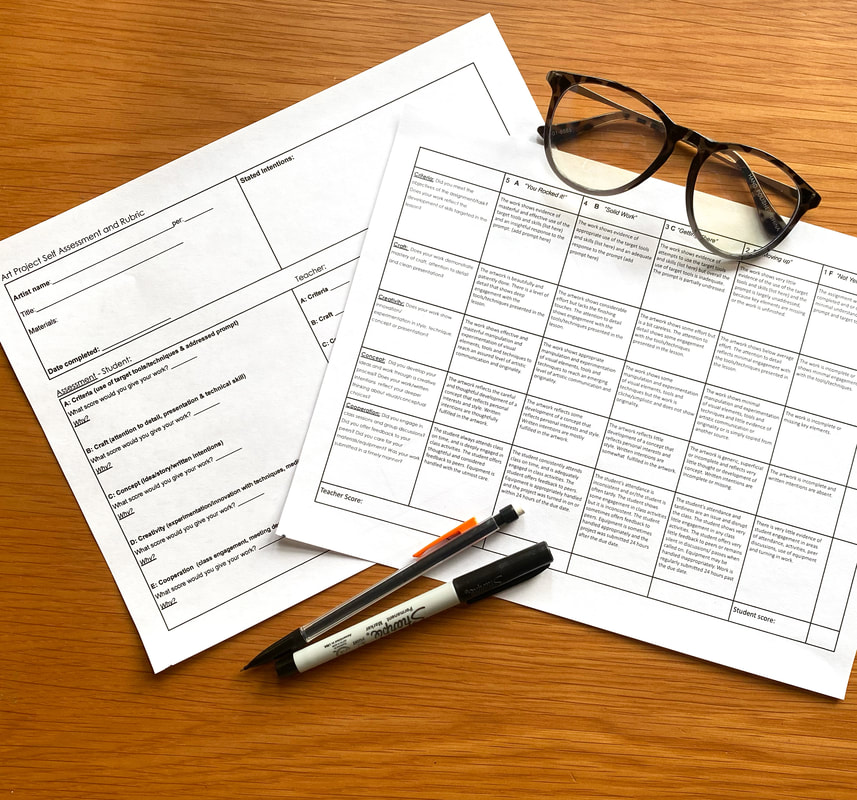 The end of the semester is quickly approaching and I'm planning my final arts assessments for my classes. At my school there is a four day schedule dedicated to assessments and each block is 2 hours so I want to use that time strategically and get the most out of the final day of classes with my students. I have created several different types of summative assessments for the end of the semester including tests, critique/gallery walk activities and slideshow portfolios for my art students over the years and I think they are all valuable in their own ways and work for different groups of students. When designing these assessments it is important to start with the question: What are summative assessments used for? What do you want to learn about the student through this assessment and what do you want the student to learn or understand at the end of the process? All of my assessment strategies are rooted in my rubric. You can find an editable version of my art grading rubric here. Criteria-meeting goals/objectives of the lesson, Creativity-experimentation/innovation in the process, use of the formal elements or concept, Concept-idea, story, prior planning/thought, Craft-presentation, attention to detail and Cooperation-clean up, timeliness, work with peers. Through these summative assessment activities students will be guided to reflect on their performance in class in terms of each criterion. The goal is to see their success as learners of art instead of just focusing on the finished products they created that semester. I want to share my most helpful summative assessment strategies for visual arts classes and describe the process and the ways they have worked in my classroom with different levels of art students. The goal is to help you plan an effective strategy for your students that makes use of the end of the semester assessment schedule. Process Portfolio Assessment Using Google SlidesFor most of my classes (Digital Art, Advanced 2D Art and Foundations 2D Art) I like to assign a structured Final Portfolio assignment on Google Slides that focuses on the process, rather than the finished product. I started using Google Slides for these portfolios during remote teaching in 2020-2021 and I found that this platform worked well because students can easily share their presentations and comment on one another's work. I borrowed this format from the Process Portfolio in the IB (International Baccalaureate) Visual Arts curriculum, which I taught for 8 years. What I like about the idea of a process portfolio is that the focus is on the learning and the creative process rather than the finished artwork. It is also a way for students to reflect on their learning and to see the progress they made in their understanding of art concepts, techniques and their own ideas and concepts. The Process Portfolio my non-IB students create is a much simpler version than what is required for IB but the general idea is the same. Here is the Process Portfolio Template that I share directly with students inside Google Classroom, I just use the "make a copy for each student" feature so that students each have a named copy to edit and submit. The process portfolio includes sketches, smaller class activities and mini projects and longer investigations and multi step projects. Throughout the semester I encourage students to take process photos and screenshots and to save them for the portfolio. I also require students to turn some of these process images into Google Classroom with a written reflection so that they can just download and compile these images later on in the semester. It is key for students to know they have to produce this Process Portfolio for the final day early on in the semester and be reminded of it often so they have all the documentation they need to make a visually appealing and content rich slide. Visual Arts Test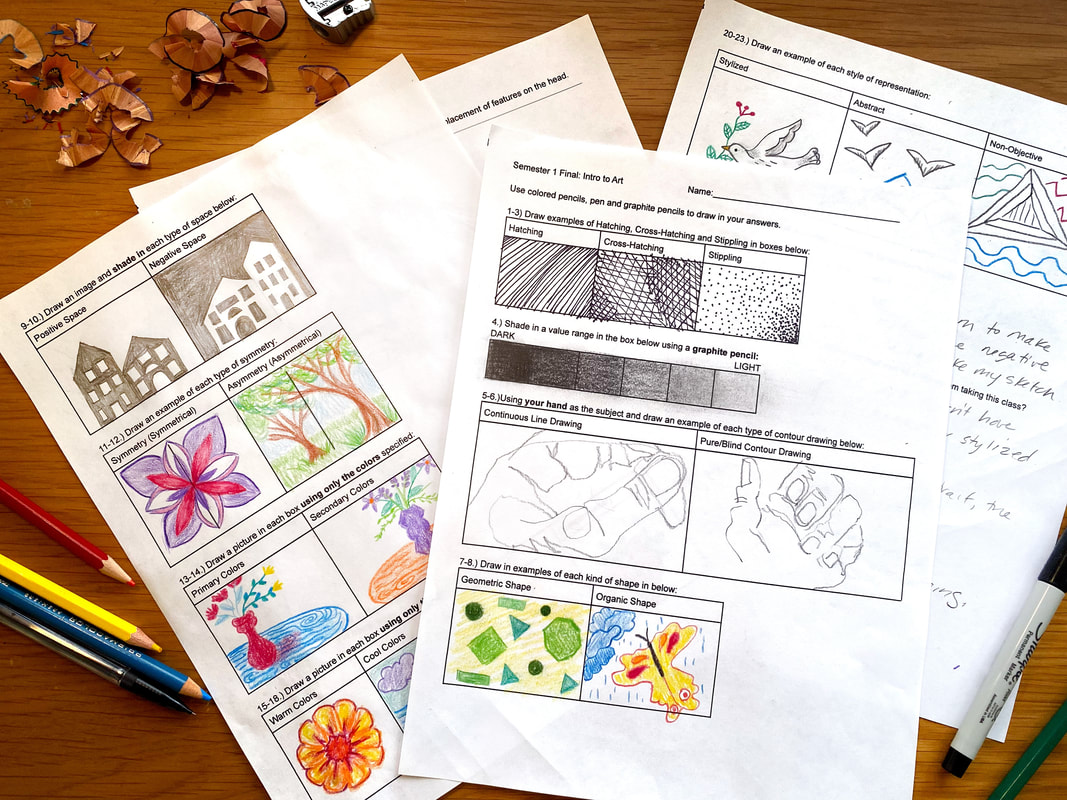 The concept of a testing a student in a fine arts class seemed really strange to me when I first started teaching. In my first year our principal required every class give a summative test at the end of the semester. It also had to be over 30 questions. At first I was annoyed, nothing in my teacher training program prepared me to give a test for visual arts students...as a student teacher I never observed an art teacher giving a test and my master teacher always had a studio clean up during the assessment block and no formal assessment activity. I sulked for about 5 min and then I started thinking about what a test could offer my students. Could the visual arts test give my students a chance to reflect on their learning? Could it help them make visible all the progress they made over the semester? Could it give them time to be creative and actually be fun during a stressful week of back to back exams? The answer was Yes! to all of these questions. My particular group of learners at that point was mostly English Learners and I didn't want to create a language heavy test, my goal was to get students to demonstrate their understanding with as few words as possible. I decided to start with going over all of the concepts that we discussed over the course of the semester and then designed a test that was "draw in the blank" students would demonstrate their understanding through drawing. I followed up these drawing based questions with a few self reflection questions. Here is an editable Intro to Art Test that you can tailor to fit the needs of your students. To prepare for this test I created a game called "review bingo" so that students had practice with all the concepts prior to the testing day. I created a 4"X4" grid and filled in the squares with the definitions of various art concepts/vocabulary that would be on the test. Students cut out these squares and draw an example of the term on the back. So for example if the card said: "a type of shape that is irregular and often seen in nature" the students would draw an organic shape on the back. To play students would put all the definitions face up and then I would read out the definitions in class and as I read one they would turn over their square. Here is a slideshow that I use to teach the students this process. Once a student gets four squares with the drawings face up in a row that student would yell "BINGO!" and I check the drawings to make sure they are correct and then the student can choose a candy or prize (art supplies and mini candy bars). Here is an example Review Bingo Card to give you an idea of how you could make your own.  Gallery Walk and Critique CardsI typically like to have students participate in a Gallery Walk or have a Critique Activity on the day of the final assessment. I like to do a Gallery Walk for intro students to get them used to looking closely at the work of their peers and commenting on artworks using post-it notes. Students are instructed to not use the phrase "I like" and I include several sentence starters on the board as a guide. I also put up posters with the elements of art and principles of design and instruct students to focus on the elements and principles when talking about formal (physical qualities), I also put up some words and sentence starters for talking about the conceptual qualities of a work. Students can also ask a question on their post it note about the artist's process or intentions. Each student gets only 5 post its in a large 35-40 student class or 3 if the class is 20-25 students, that way students have to think about which piece they want to comment on. They also write their name on the comment so there is accountability for what they say and so that the artist can talk to their commenters at the end of the Gallery Walk. For Advanced Students I like to use Critique Cards to guide the critique conversation. This is something I adapted from an activity I learned about at a conference for IB (International Baccalaureate) Visual Arts teachers that I attended in Florida in 2014. I included the full procedure for this critique activity in this lesson resource if you are interested. 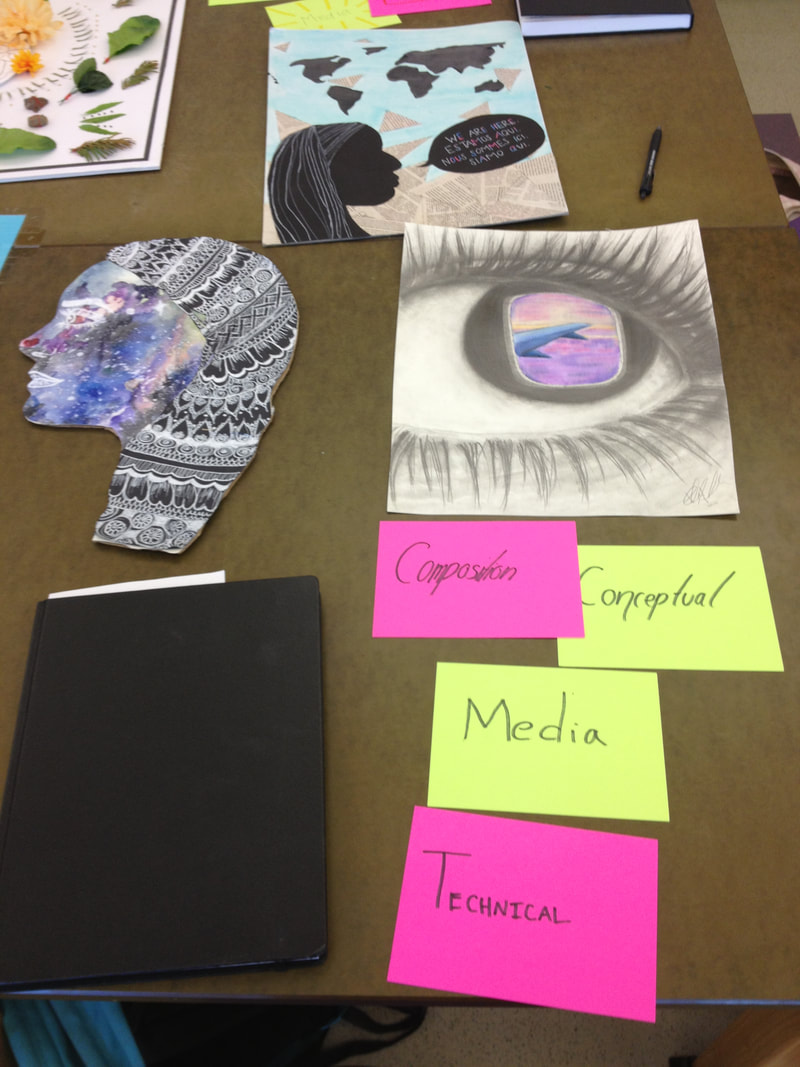 Critique CardsThe critique cards activity requires some prep, each student needs four colored index cards. On one side they will write the qualities they are assessing in each work. These could be your own rubric criteria or you could use the terms seen in this photo: Composition, Conceptual, Media, Technical. Students will need to understand what this means so I typically teach a whole lesson about this at the start of the year and practice this activity at the end of each unit so by the day of the final assessment students understand what each of these terms means and how to describe them when looking at other's work. Students will arrange the cards in front of their own work with what they think is the strongest element at the top. Then during the critique students will move the cards if they disagree with how the artist has placed them and justify their changes by citing evidence from the artwork and written intentions (artist statement). 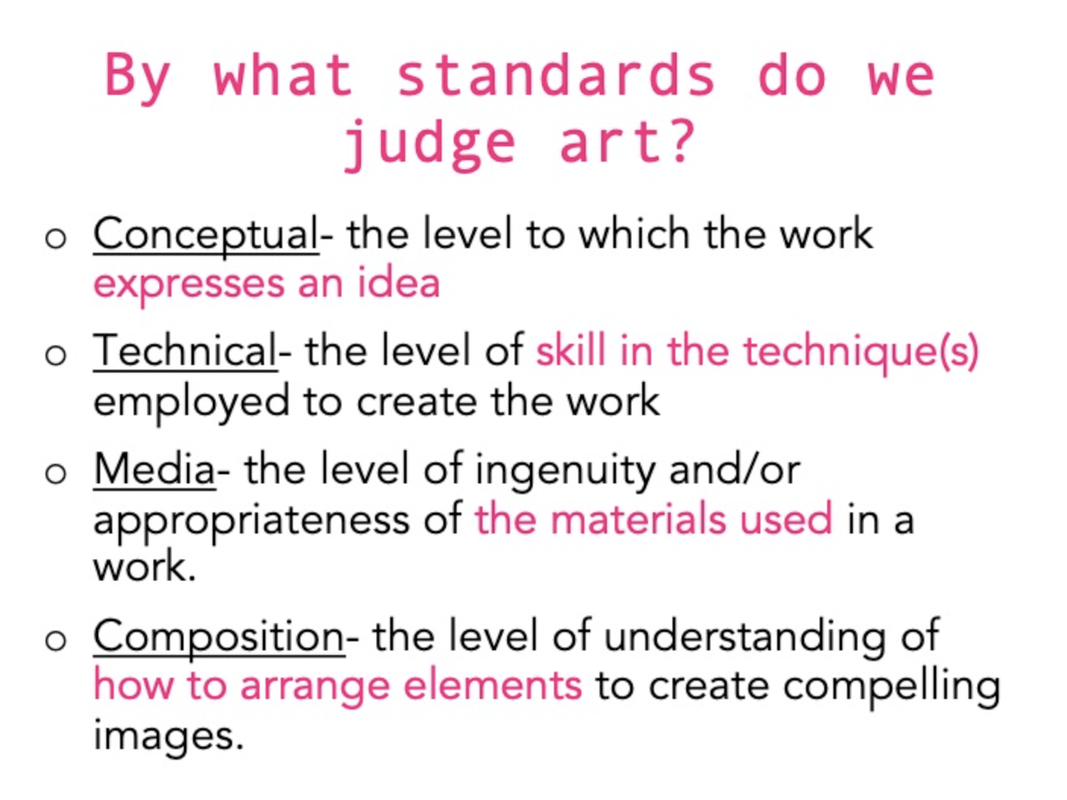 I like this approach because the goal is to be looking at the artwork for its strongest elements, and focus on what is working in piece. This makes the process more constructive and positive without students saying "I like" all the time. Below is an example of how I teach students to understand how to rank these qualities, I like to use examples from Art History that I cover in my introductory "What is Art?" lesson for my Advanced and IB Art students. I have a blog post about this lesson if you want to see more about how I teach students to use Critique Cards for final arts assessment blocks. 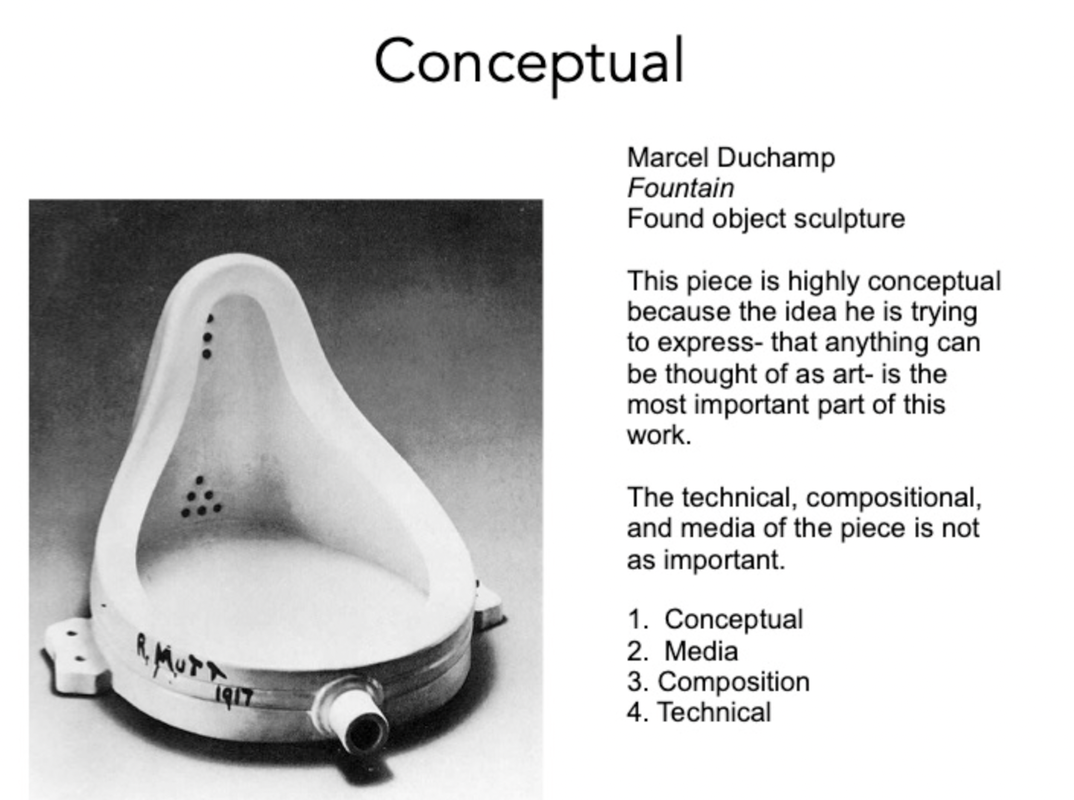
0 Comments
Leave a Reply. |

AuthorI'm a high school/middle school art teacher with 16 years of experience. I'm here to help art teachers free up more time and space in their lives through lesson ideas and ready to go content rich, engaging curriculum. Categories
Syllabus Planning
Sketchbook Covers First Day of School Avoid Teacher Burnout Digital Self Portraits Surrealist Techniques Features of the Face Bilateral Mirror Activity Gees Bend Art Lesson Arts Assessment Favorite Fall Lessons Chicano Artists Art Materials Guide IB Process Portfolio What is Art? Pattern Design Figure Drawing |


 RSS Feed
