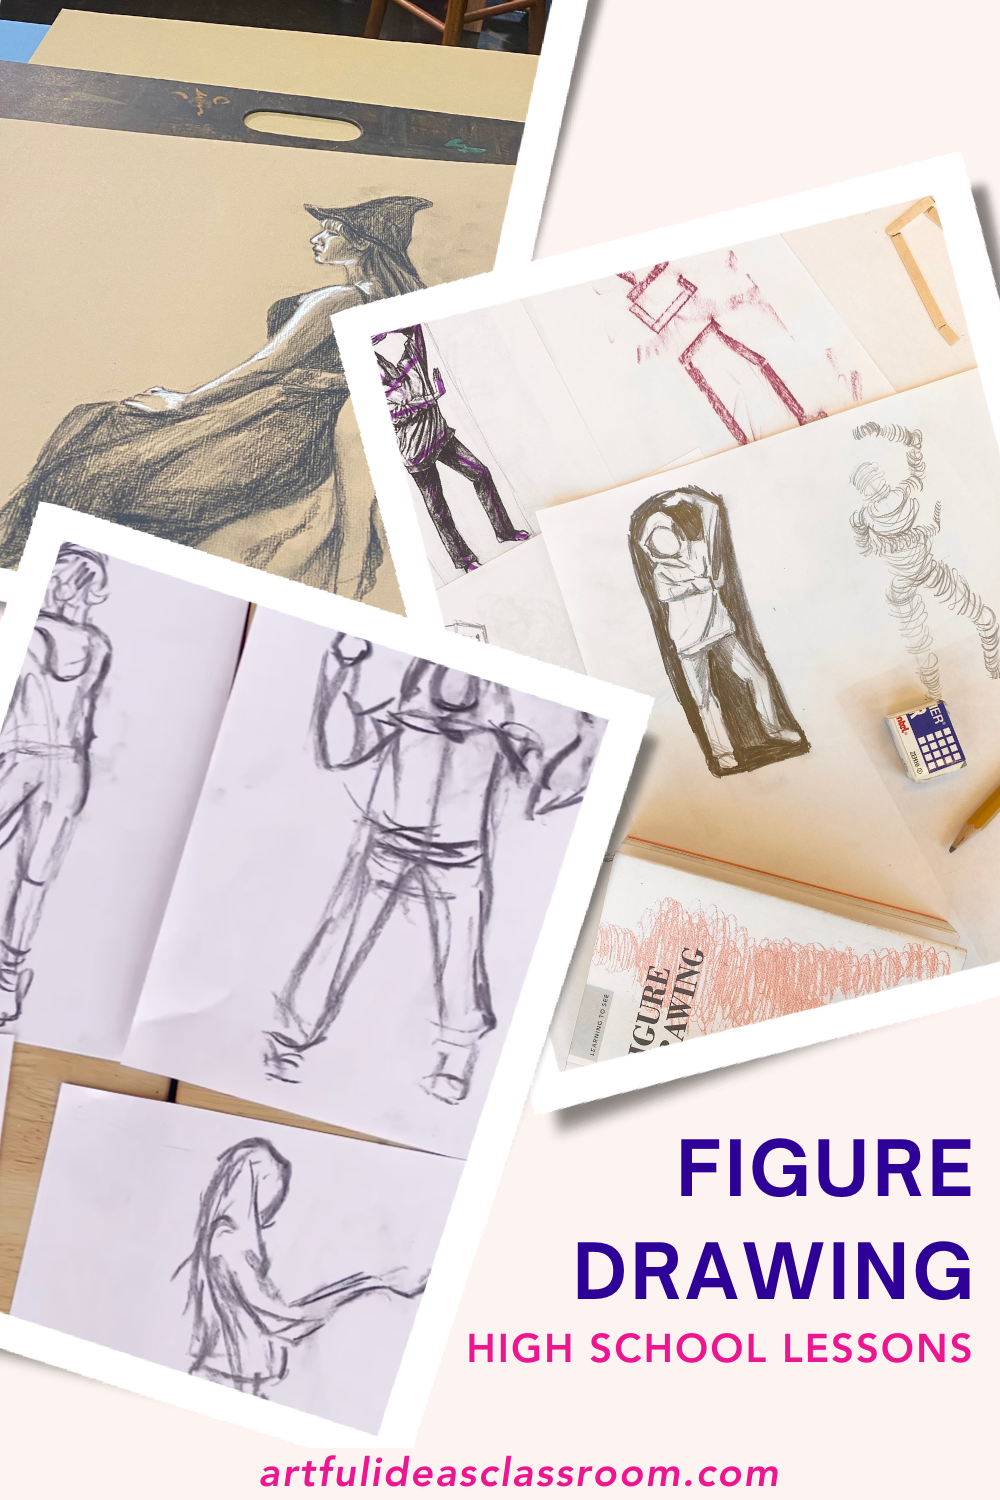
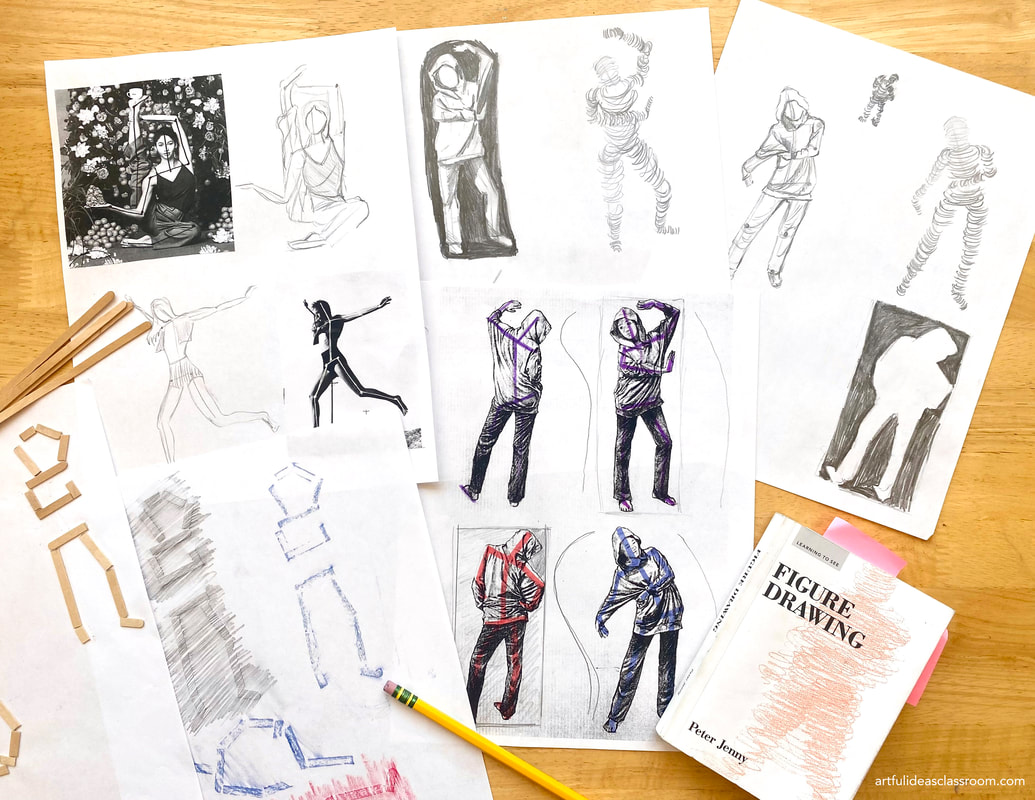
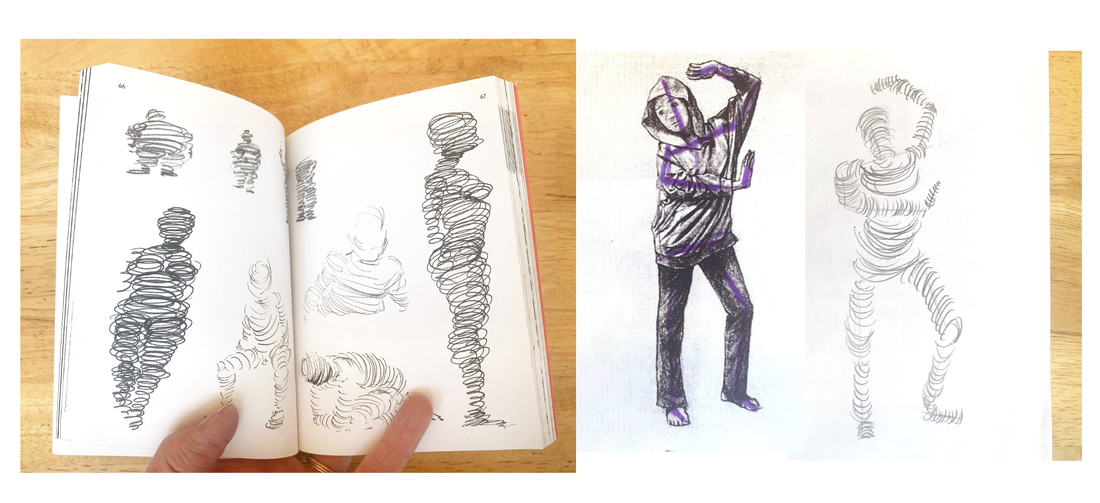
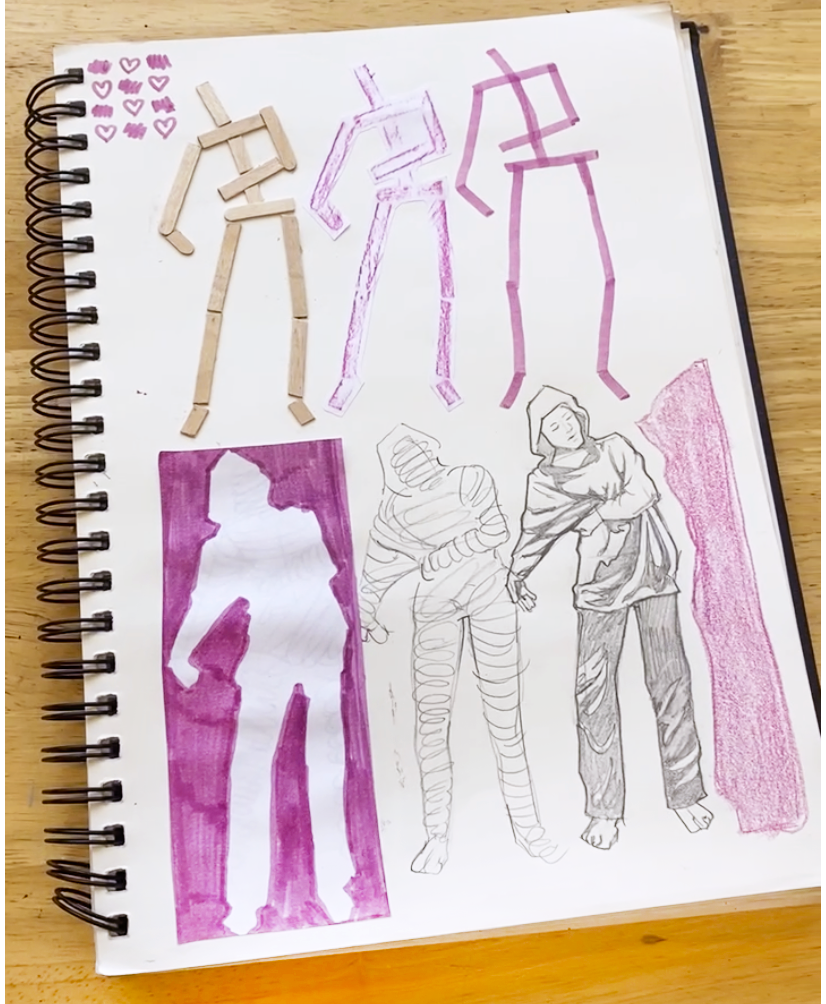
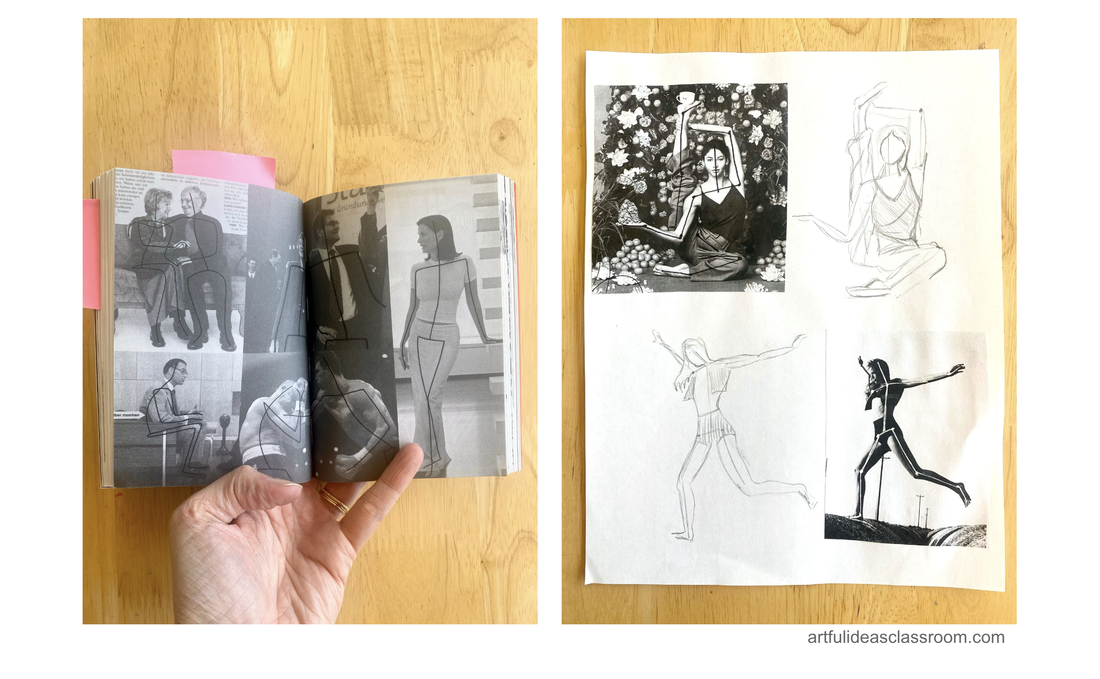
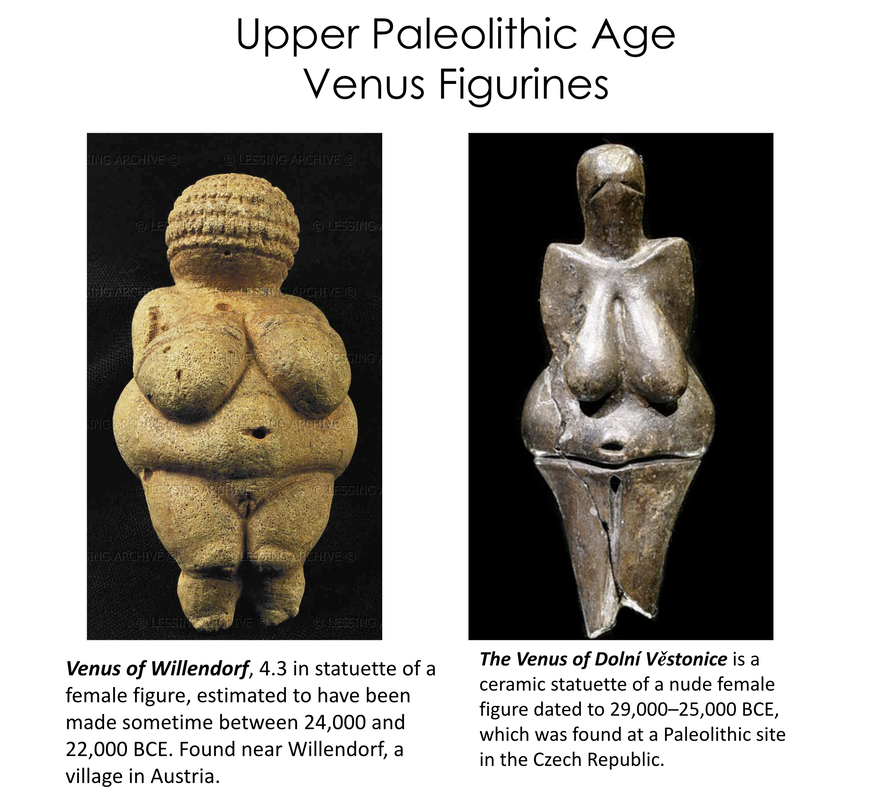
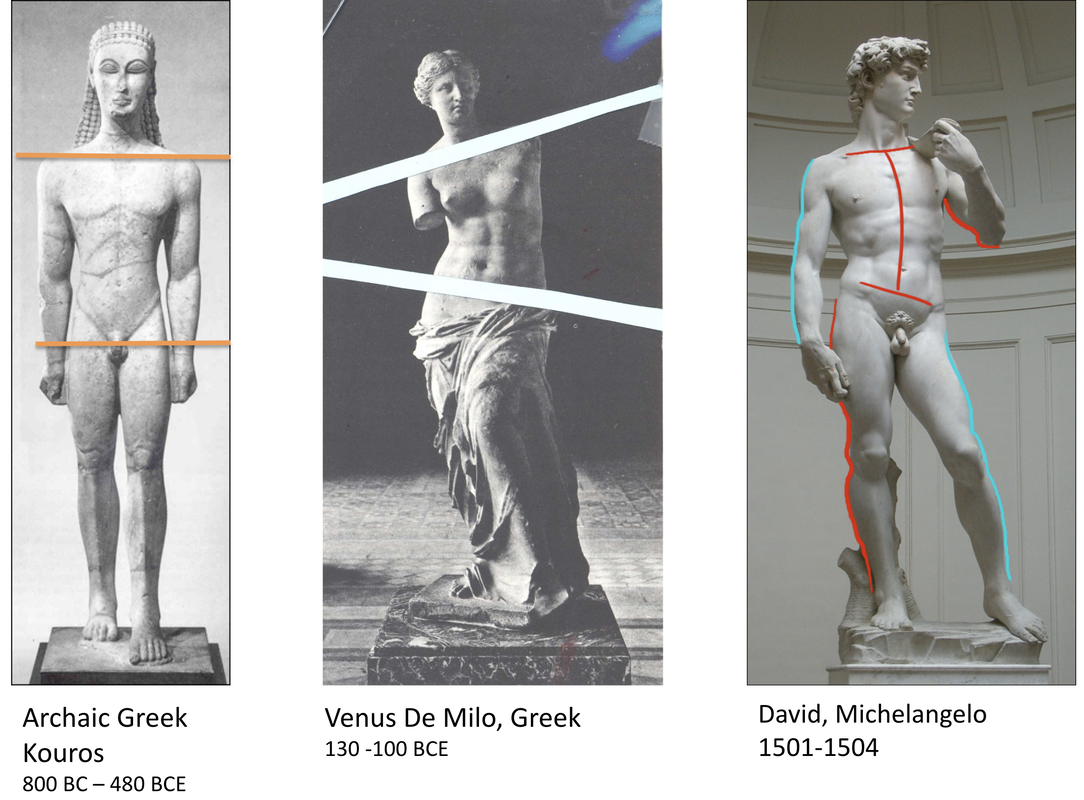
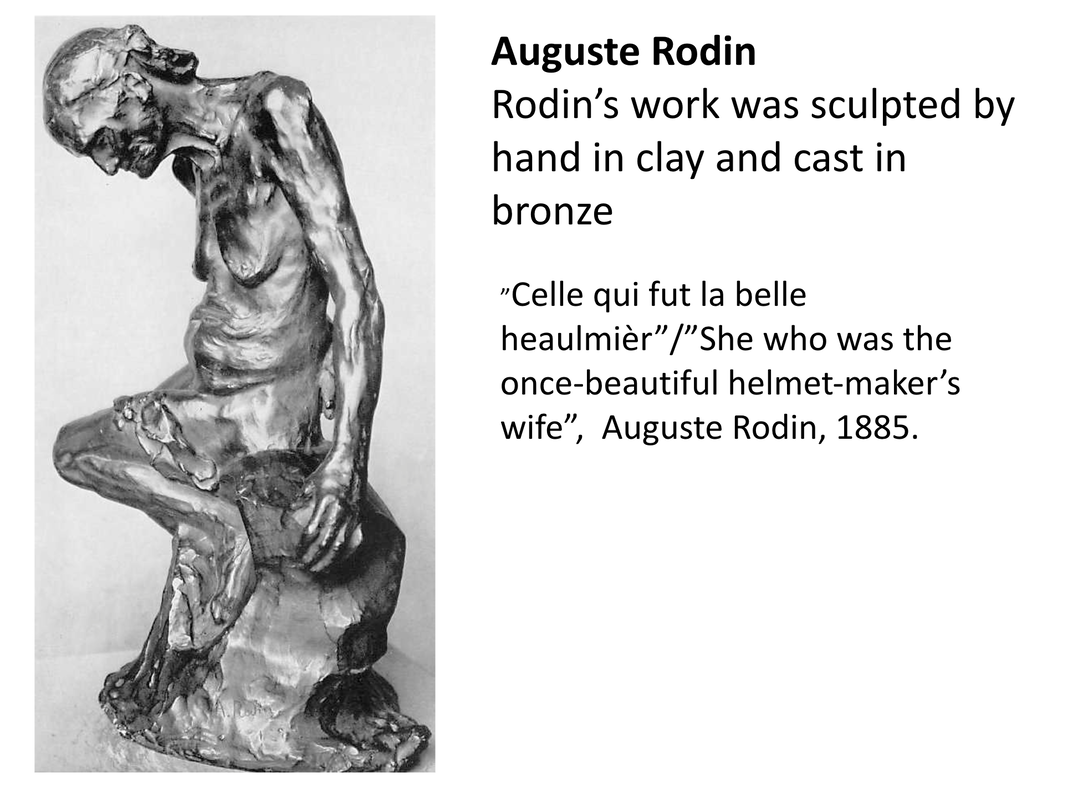
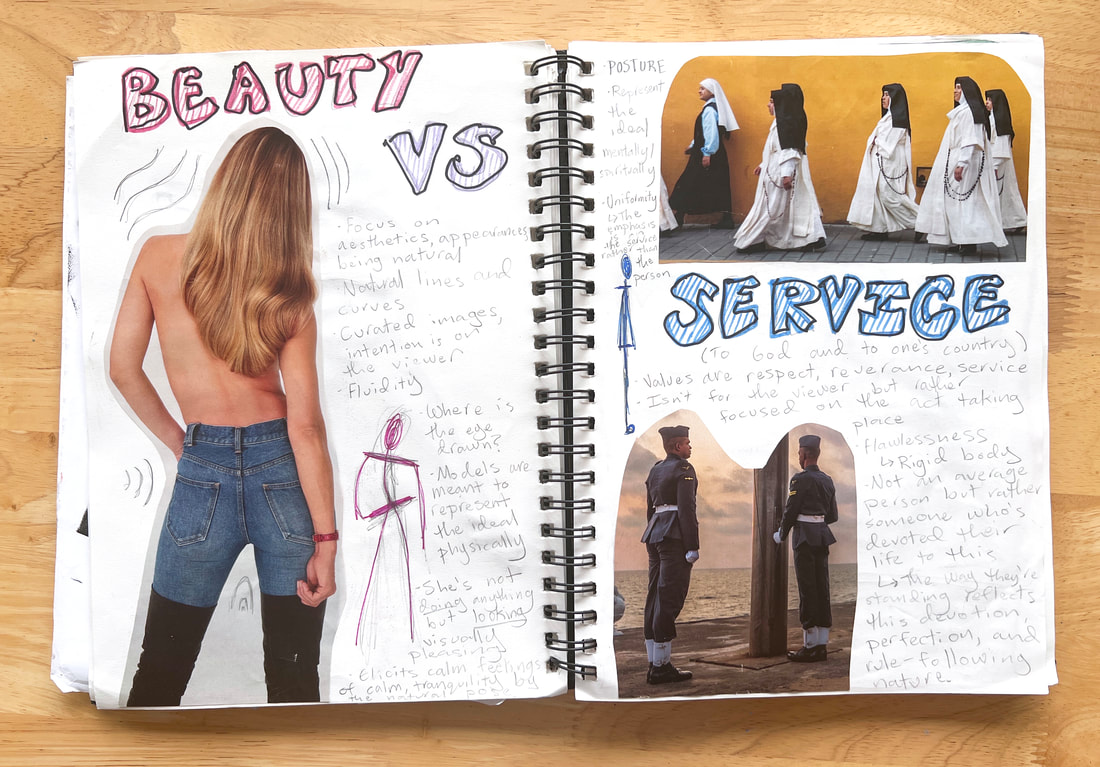
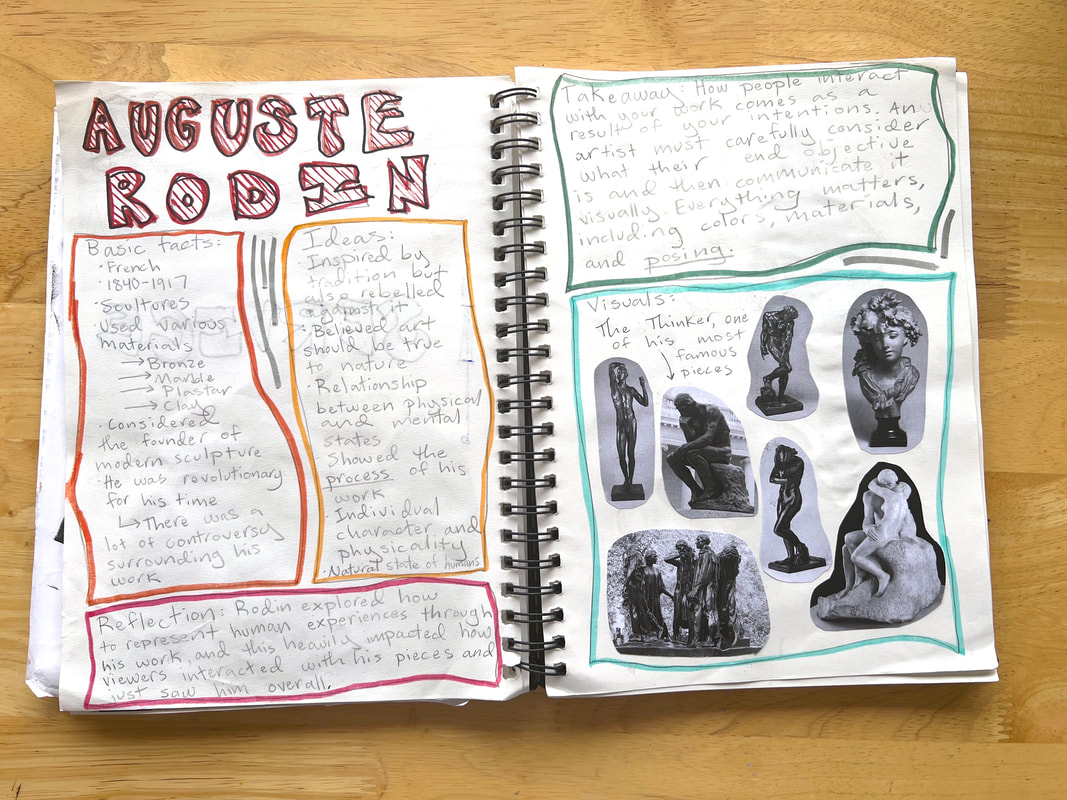
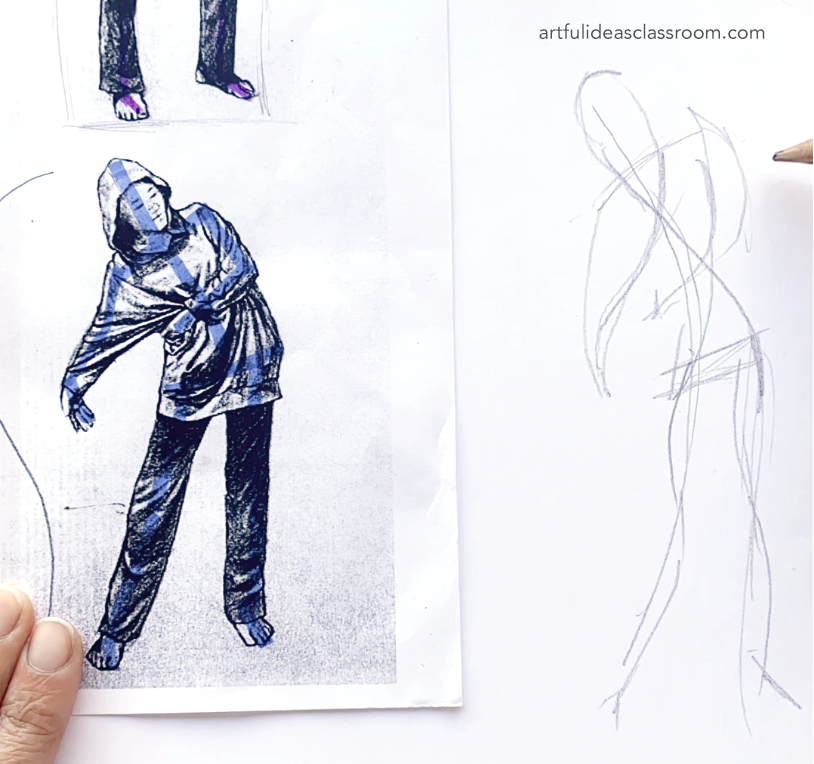
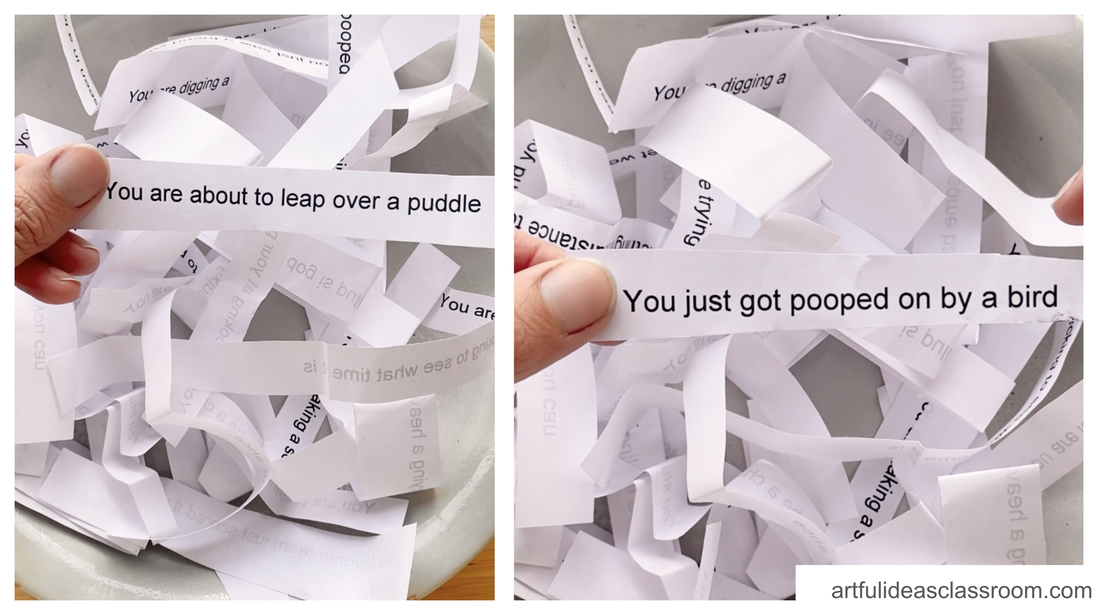
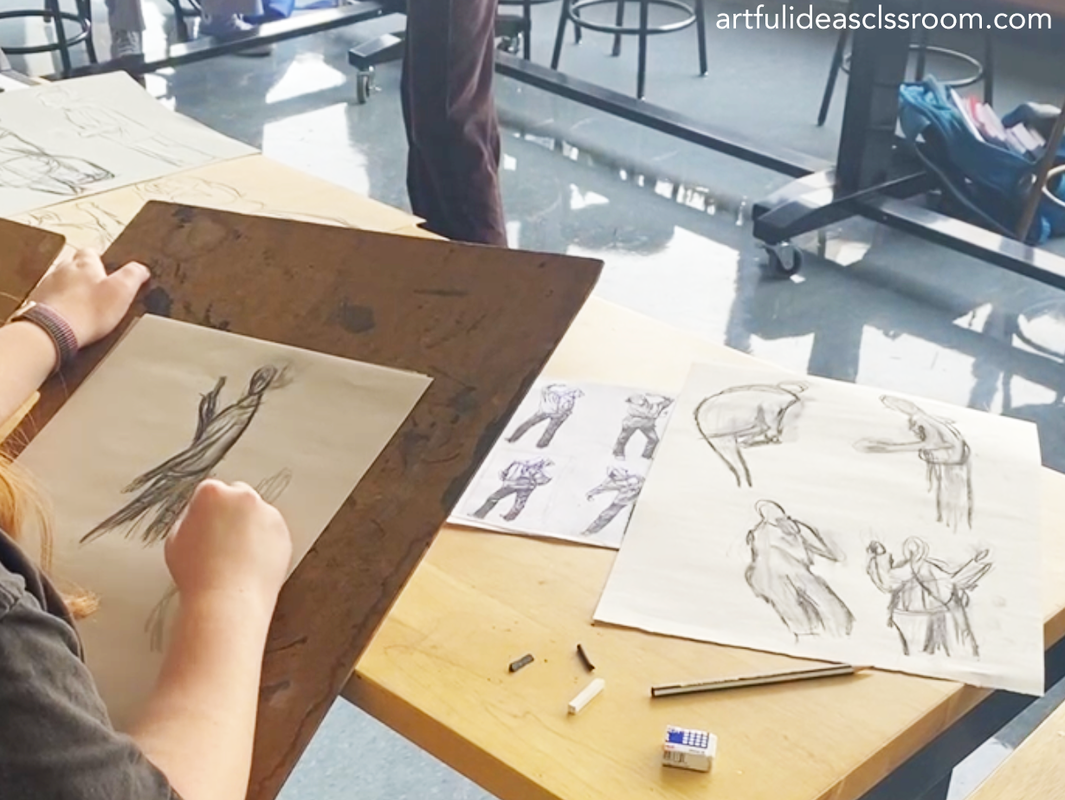
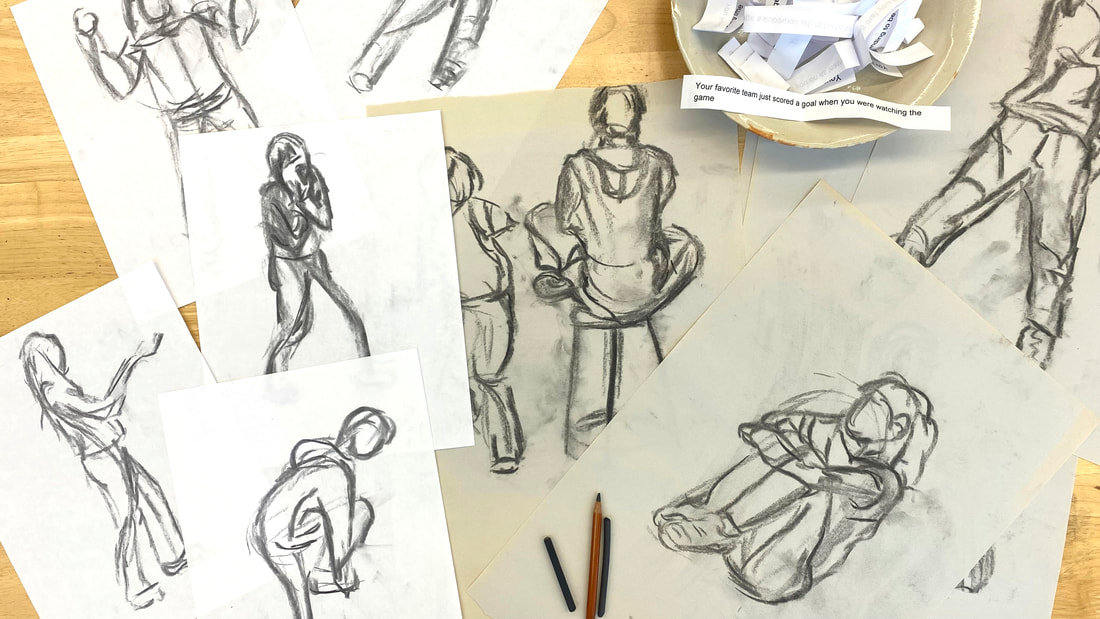
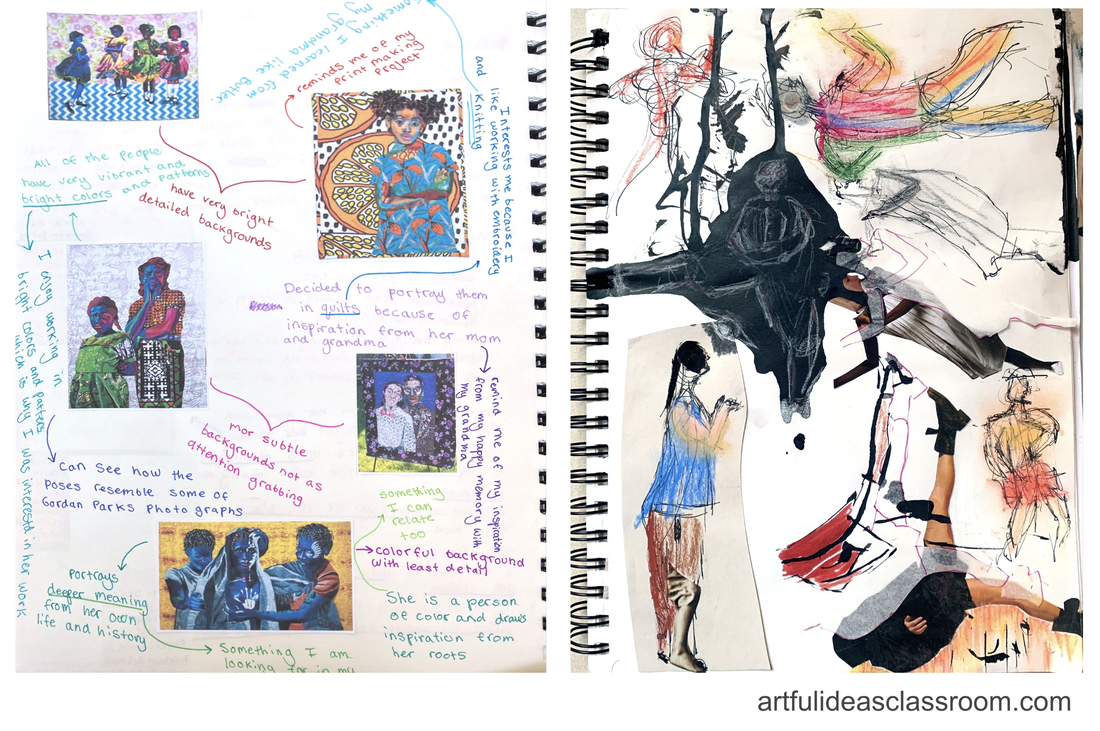
Figure Drawing for BeginnersThis year I had the opportunity to design a new semester-long honors level advanced studio art class for students interested in building a portfolio. When planning the curriculum (if you are interested to see how I plan my curriculum check out this blog post and download this *free* Syllabus Planner,) I knew I wanted to include a unit on gesture and figure drawing. Figure drawing helps students develop fundamental drawing skills like observation, proportion, and perspective while also offering opportunities to create expressive and meaningful artworks. When planning I wanted the unit to include sketching exercises students could do on their own using reference images, gesture drawing from life and a field trip to a local art studio for a class with a clothed model. Figure Drawing ExercisesTo start the unit I really wanted to avoid overwhelming students with too much information about proportions or anatomy. While I think this is important for having a deep understanding of the figure, for this single unit in a semester-long class, I wanted to really focus on gesture drawing and observation from life. I wanted students to instead focus on the gesture of the figure. I began with the question “what is the purpose of gesture drawing?” and showed my students examples of gesture drawings and the many forms they can take. We then practiced creating gesture drawings using the book Figure Drawing by Peter Jenny. This small book is one of the best figure drawing for beginners books, it consists of drawing exercises anyone can do (from beginner to advanced) using photo references or from life. There are many gesture drawing exercises to choose from and I chose a few that looked fun and approachable to begin with. I had a printout of figure drawing reference images that I found years ago on Pinterest and have been using in my classes for years- I tried to use Google Lens to find it and find the image source and wasn't able to locate it so if you know where it's from let me know so I can make the proper acknowledgements here. I like this reference because the folds and stretching in the drapery and the hoodie wearing figure shows how the body position changes as the weight of the figure is on different feet (contrapposto) it is pretty nondescript and not overly stylized so students can just focus on the pose of the figure and draping of the fabric. Stick Figures: Figure Drawing Exercise for BeginnersThe first exercise I chose for the students to try was one called "hold" where matchsticks were used to suggest the basic lines of the figure (essentially a stick figure) and then glued down and used to do a texture rubbing. The idea is that by using creating texture on the paper we can "see with our fingers." Instead of matchsticks because they are not readily available (or safe at school?) I chose to use wooden coffee stir sticks- these are easy to find and students don’t need many-I gave 2.5 sticks to each student. We conveniently have them stocked in the teachers lounge/ mailroom at our school. I created a few demo figures so I could try out different methods of sticking the stir sticks down, I found that glue sticks work just fine and scissors cut the sticks easily. Using the worksheet I was able to easily copy the angles of the hips and shoulders and to then add the arms, legs and head angles. I also experimented with using crayons and pencils for the texture rubbing. Both methods worked well. I demonstrated using the document camera in class and told students to use their reference images but not to get too bogged down in the details and in trying to make an exact copy with measurements. In my examples I focused on hips/shoulder angles as a starting point but some students looked at the line of the spine to begin their stick figures. Either strategy works for this because the goal is to really look at the elements of the body and how the position/angles of the body impact the gesture of the figure. Cross Contour Volume: Figure Drawing ExerciseI guided my students through an exercise focused on using cross-contour or wrapping lines to give volume to a figure. In Peter Jenny's book it is called "Form." First, I showed them how to create a rough figure sketch based on reference images, similar to the lines in our stick figure exercise. Then, I explained the process of envisioning the curves and directions of cross-contour lines for each part of the figure. I encouraged them to imagine a string wrapping around an arm, leg, or torso, visualizing the curves it would create. I demonstrated drawing these curving lines throughout the entire figure. Additionally, I showed a more loose approach, skipping the stick figure sketch guide and just drawing the cross-contour lines. As a class, we agreed that these looser, more spontaneous figures conveyed more life and movement. For the activity, students used pencil, ballpoint pens, and felt-tip markers, experimenting with the different types of lines each drawing tool offered. Negative Space Figure Drawing ExerciseThe next exercise we attempted was called "surround" in Peter Jenny's book. It is a figure drawing exercise that focuses on negative space, or the space around the figure. I demonstrated using the document camera how to draw a box around one of the figure reference images (a close frame) so that students could really see the shapes of the negative spaces. For example the triangle made by the bending of an elbow. This also helped students notice the foreshortening in the images or the effect of limbs looking smaller than one another because of their positioning in space. During this exercise the room became very quiet because of the concentration of the students. I provided the students with felt tip markers and pencils for shading in the negative spaces they sketched so that the figure itself was left the white of the paper. Skeletonize: Figure Drawing ExerciseWe concluded with the "skeletonize" exercise from the Peter Jenny Figure Drawing Book. This activity required some preparation as I had to locate figures in magazines and make photocopies for everyone to choose from. After providing each student with three figures, they traced the major lines and added a circle at the joint, creating a simplified skeleton effect. I supplied white gel pens and black felt-tip pens for better contrast, especially with darker photocopies. Despite the exercise taking a full block period (80 minutes), it proved to be valuable practice time. I noticed an increase in students' confidence as they experimented, took creative risks, and innovated on the exercise to create more stylized and simplified figure drawings based on the reference images. Approaches to the Figure in Art HistoryCreating a slideshow exploring the figure in art is a tall order and there is just no way to cover the importance of the figure across time, cultures and different mediums/genres of art. I had to simplify the focus so I decided to compare a few of the different styles of representation of the figure from a sampling of cultures and time periods. I chose to focus on abstraction/simplification (symbolic figures), idealization and realism. This really helped to focus the discussion on what is conveyed through these different styles and through the poses of the figures themselves. The class that I taught this lesson to is an advanced class made up of only juniors and seniors in high school (16-18 year olds) and I asked ahead of time about their level of comfort with the unclothed form. I would recommend thinking about this before showing any nude figures in an art class. I chose examples carefully and made sure to reinforce the purpose of looking at these works of art, to learn about the way artists have represented the figures throughout time and not to objectify the male or female form. This discussion took 30-35 min and I paused for students to journal ideas/ speak in pairs throughout the slides. Since our class periods are 80 min this left 45-50 min for the hands on art journaling activity following the slides and discussion. Stylized and Abstract Figures in Ancient Art HistoryTo explore stylized and abstracted figure art in the Ancient World, I decided to start with Venus Figurines, small carved stone or ceramic statues from the Upper Paleolithic that depict stylized female figures. Perhaps the most famous of these is the Venus of Willendorf, a small (11.1 centimeter/4.4 inch) tall figurine depicting a highly stylized rounded female body, which was found in 1908 in Austria. The artifact is estimated to be around 25,000-30,000 years old and is widely interpreted to have been a symbolic figure of fertility. I also showed students the Venus of Dolní Věstonice, which is another example of Venus figurine that is of the same time Paleolithic time period (25,000-29,000 years ago) but this one was made of fired ceramic (one of the oldest examples) and was discovered in what is now the Czech Republic. I chose to start with these because they are among the earliest surviving figurative artworks (along with cave paintings) that we have. It is fascinating to see the simplified curving forms of the female figures portrayed in these figures and think about why the artists may have chosen this style of representation. We also looked at figure sculpture examples from the Nok Culture in Western Africa from the Neolithic period (500 BCE). I shared some facts about the materials used to create these figures (terracotta) and we discussed the style and poses of the figures. I also shared images of figurative art from the “ancient world” including Egyptian papyrus paintings, Archaic Greek vases and Hindu temple statues from India and Southeast Asia. We discussed some of the symbolic meanings of the figures and how they were used to tell stories about gods, religion, mythology and heroics. The students noted the simplicity and abstraction of the representations and the rigidity of the figures. Idealized Figures in Art HistoryWe then delved into idealism in figure art, exploring examples such as Greek figure sculpture from the Hellenistic period, with a focus on Venus de Milo (150-110 BCE) to draw parallels to the Paleolithic sculptures discussed earlier. Students discussed with their partners what they observed in this idealized figure and considered the meaning of "idealize" in art and culture. In the discussion, we also examined Michelangelo’s David (1501-1504), discussing its subject (Hebrew King David) and why idealizing this form represented the grandeur of the Renaissance era and the significance of the city of Florence. A brief mention was made of contrapposto, a pose where the figure has more weight on one leg, evident in Hellenistic Greek figure sculpture and Renaissance artworks like The David. This pose gives a more naturalistic and dynamic look to the figure, mirroring how people generally stand. I presented a slide of early Archaic Greek sculptural figures known as kouroi, which have evenly distributed weight and appear more rigid and less lifelike. Students then compared the idealization of these past eras to the idealization seen today in magazines and social media figures. I was proud of my students for their ability to connect Art History with contemporary topics they are familiar with today. Realism in Figure ArtThe last style of representation in figure art that we discussed as a class was realism. We looked at the sculptural work of French artist Auguste Rodin. We started with The Thinker, 1902 to tap into prior knowledge, because most students had seen this figure sculpture before. We discussed the pose and how the texture of the sculpture is rough and the figure is represented in a quiet moment of contemplation rather than in a moment of heroic action as often depicted in idealized sculptures. Next we looked at “Celle qui fut la belle heaulmièr”/”She who was the helmet-maker’s once-beautiful wife”, 1885. This sculpture depicts an old woman, sagging chest bare with her head lowered in grief/exhaustion. The texture of the sculpture is very rough and the fingerprints of the artist can be seen. We talked about this style of representation and the humanity of the figure. Students expressed that although almost grotesque in its realism this figure evoked more emotion than the idealized figures. Art Journal Pages Exploring Figure ArtTo wrap up the discussion I assigned students a research page in their art journals, in which to explore how figures convey different moods/ emotions through the pose and style of representation of the figure. Students could take this research in any direction they wanted to explore and I made lots of resources available from Art History reference books to old art magazines to use for collage in their journals. I was impressed by the depth of the art journal research pages students created in response to our Art History figure art slideshow and discussion. Some students chose to focus on a particular artist or series of artworks while others focused on particular poses and gestures seen across genres of art. When students are working in their art journals I typically will walk around and have one on one discussions with students to get a sense of the ideas they are researching and exploring and offering suggestions when I can. I also encourage my students to include their own studies/sketches based on the artworks they are researching on the research pages along with the written information and reflections. It takes a while for students to grasp the idea of artistic investigation, often initially they will gravitate toward listing facts about an artist or artwork instead of analyzing and responding to the work. I was excited to see these pages because most students demonstrated deeper thinking and reflection on their pages. What is Gesture Drawing?Our next studio session was focused on answering the question “what is gesture drawing?” Many students were unfamiliar with the concept and I began by showing some examples of gesture sketches. I explained how they are created from observing a model from life and in short time periods anywhere from 15 seconds to 1 minute. Next I showed students a video from artist Carlin Peters in which she describes/demonstrates how to find the “line of action” in a figure and how to approach gesture drawing for beginners. The line of action is a line that can be drawn to express the essential movement of the pose. It can be a hard concept to grasp because it is something the artist decides based on observation so there is no “right answer” so to speak, although experienced artists would probably agree on the lines of action of particular poses. Another great video resource I found on this topic came from the artist Josh Papaleo on Youtube, his video Life Drawing: Line of Action shows him finding the line of action in a variety of photos of figures in dynamic poses, I like how all the photos are clothed models and that he times the gesturing drawing process the level of detail he is able to achieve in short periods from 30 seconds to 2 minutes. After watching a portion of each of these videos we practiced finding the “line of action” in our figure reference image pages (from the first figure drawing lesson) and I demonstrated over the document camera how to use the line of action to create a gesture sketch. Students created their own sketches using their figure reference images and I walked around and checked in with students individually, I encouraged them to draw quickly and the whole warm up exercise took only about 5-7 minutes. Gesture Drawing from Life in ClassNext we transitioned from gesture drawing from 2D references to drawing from life. I had arranged the room in a U shape so there was space in the center for a model. I also prepared by giving each student a large drawing board with several pieces of newsprint and a few pieces of charcoal paper. Students also had vine charcoal, graphite sticks and white charcoal pencils to work with. I explained to students that they would take turns posing for their classmates and would be holding the pose for 30 seconds to 1 minute to start. To make the process more fun and ease anxieties I prepared a set of silly prompts for students to base their poses on. I typed these simple prompts out, printed them and cut them into strips that could be selected at random by students as they got up to model. The prompts vary from simple to silly, some examples include: “You are leaping over a puddle” or “you go pooped on by a bird.” I told students if they didn’t like the prompt they selected they could choose again. This worked out pretty well and took the pressure off of students to come up with a pose all on their own. We started with short 30 second poses and worked our way up to longer 2-4 minute poses with a stool or chair to support the student/models. As we worked through the gesture drawing session students became more comfortable with both drawing and modeling and for the later long poses students didn’t need to choose a prompt, they simply used the chair or stool to support their pose. Gesture Drawing for BeginnersThe environment of the class was focused but also playful and supportive. I think this activity worked out so well because so much trust had already been built among the students. We did this project about 6 weeks into the semester and I think that was the perfect amount of time for students to build that trust and sense of classroom community. Building community has been a focus for me as a teacher the past few years following the remote learning days of the pandemic in 2020. I design structured interaction and collaboration opportunities into every lesson to help support students in building essential social skills and relationships with their classmates. This activity brought the students closer and brought a lot of joy to the group. We ended up doing these gesture drawings for two class periods. The first was just 40 min since we did the warm up lesson and the second we took the full 80 minute block period to model and draw. I even took part in modeling and had a lot of fun! Connecting Historical Figurative Art to Contemporary ArtIn this lesson, we also explored the connections between contemporary artists and art historical representations of the figure. As an art educator, it is important for me to demonstrate to my students that art-making is a "conversation" across time and cultures in which they actively participate. Establishing these connections between art history and contemporary art practice serves this purpose. We often looked at a few contemporary pieces as the day's “warm-up” and students responded in their art journals and discussed ideas in pairs. Some of the pieces and artists we investigated throughout this unit include:
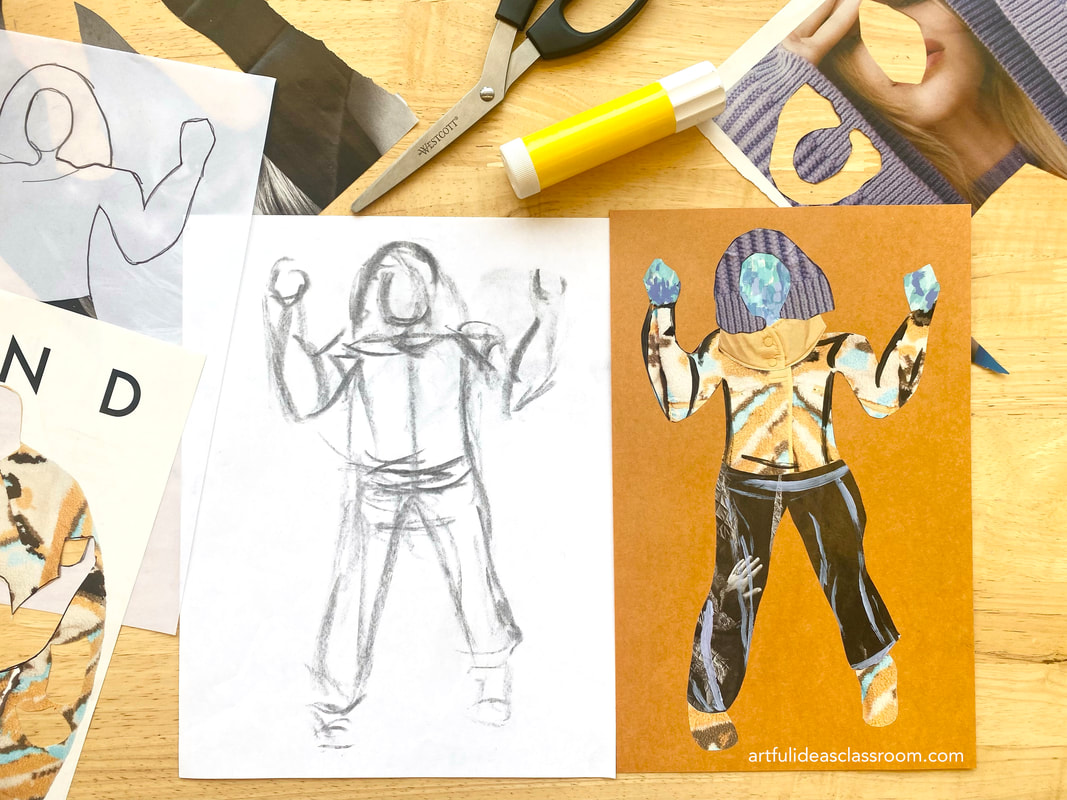
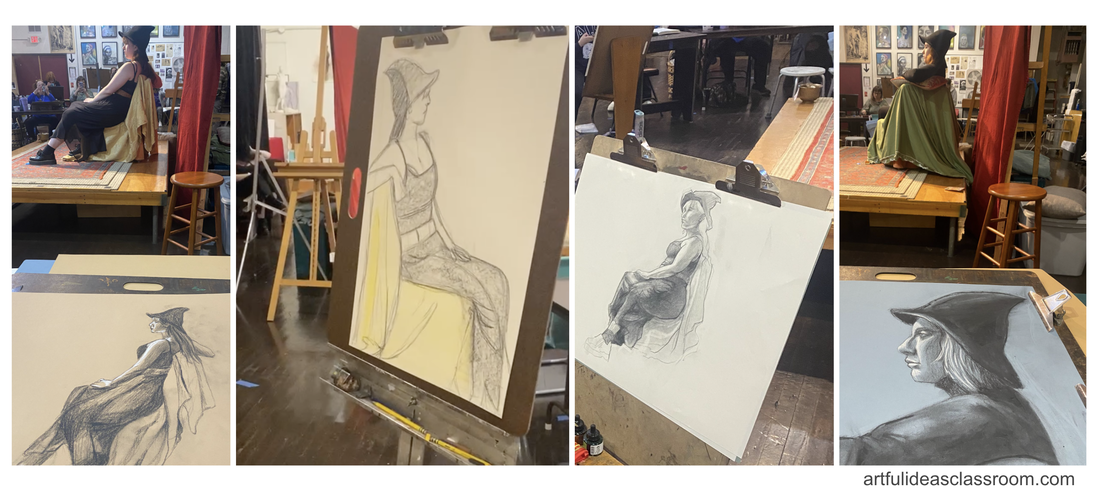
Figure Collage ActivityAfter two class periods of gesture drawing and taking turns being the figure model, students had several pages of gestural figure drawings. I wanted students to use these drawings to create a study in a different material and to take time to develop the gestural image into something more substantial. I decided to take one of my own gesture drawings and try making a collage inspired by the lines of the drawing. The process was challenging and engaging and required visual problem solving and although the completed collage lost fluid quality of the original gesture drawing it had its own visual complexity that highlighted the aspects of the form in new ways. I also like how this activity directly connects to the work of Deborah Roberts and Bisa Butler, two contemporary artists that we discussed in class. Deborah Roberts works with collage to create figures often with exaggerated or distorted proportions because of the varied imagery she uses. While Bisa Butler’s textile work draws on the tradition of quilting and color and pattern are much more central to the compositions than proportions. A few students had even created art journal research pages about these artists so it was a wonderful opportunity to revisit this contemporary work and try our own collaged figures. I demonstrated a few techniques using drafting vellum to trace shapes to use as templates for cutting out paper to fit the figure. We also have a light table in the classroom which several students found helpful in their process of collaging the figure. The finished collages were varied and students enjoyed developing their sketches into a more finished composition. Life Drawing Class with Costumed ModelThis unit also included a field trip to a local life drawing studio for a costumed model drawing session. The timing, right around Halloween, added an exciting twist as the class featured a model dressed as a witch. To enhance the students' creative exploration, we prepared individual kits containing an array of materials, including vine and compressed charcoal, charcoal/white charcoal pencils, graphite sticks, colored conté crayons, and kneaded erasers. Additionally, we brought various types of papers, ranging from newsprint to pastel/charcoal drawing paper with different tones. The three-hour drawing class mimicked the structure of a college art class, starting with short 30-second to 2-minute poses for gesture drawing, followed by a few longer 10-minute poses and culminating in two extended 40-minute poses with breaks. Given that the model was clothed, we received permission to capture photographs of the longer poses for continued work on the drawings. The students actively engaged in the session, demonstrating enthusiasm from the outset. Despite being an optional weekend field trip, every student attended and stayed for the entire session. Their feedback at the end was overwhelmingly positive; they felt well-prepared for gesture drawing due to prior classroom practice, and the class seemed to fly by as they focused intently on observation and drawing. This unique experience provided a valuable peek into a college-level art class and left a lasting impression on the students' artistic journey. I highly recommend taking your students to a life drawing class, if possible. Most cities have studios or community colleges that offer these classes with clothed models suitable for teens. I discovered the class we attended through a simple Google search, and the teacher was incredibly accommodating and enthusiastic about our participation. I suggest reaching out to the studio in advance to inform them of the number of students attending and to inquire about reserving space to avoid the possibility of being turned away at the door on the day of the class. Final Thoughts on Teaching Figure Drawing for BeginnersTeaching figure drawing to high school students can be a rewarding and enriching experience. Focusing on the broader aspects of the topic, such as the purpose of gesture drawing and exploring the mood conveyed by different poses, allows students to delve into the world of figure representation without feeling overwhelmed. Introducing them to various historical styles of depicting the figure sets the stage for a more in-depth exploration in college, saving detailed discussions on proportions, anatomy, and musculature for later. Incorporating exercises that train the eye to perceive the figure as a whole fosters valuable observation skills. In-class gesture drawing sessions, where students take turns modeling, not only enhance community building but also provide a low-stakes and enjoyable way for students to draw from observation. While attending a life drawing session with a clothed model is a fantastic opportunity, it is not essential for the overall learning experience. This unit would work well in a first year IB Visual Arts class, offering a theme central to art across cultures and time periods. The discussion can seamlessly lead into the IB Art Comparative Study task, allowing students to practice visual analysis skills by comparing and contrasting representations of figures. For a more in-depth look at this lesson, you can explore the "Day in the Life" episode on the Art of Education University's YouTube channel, where I shared a full day of teaching during this fun and engaging figure drawing unit.
0 Comments
Leave a Reply. |
AuthorI'm a high school/middle school art teacher with 16 years of experience. I'm here to help art teachers free up more time and space in their lives through lesson ideas and ready to go content rich, engaging curriculum. Categories
Syllabus Planning
Sketchbook Covers First Day of School Avoid Teacher Burnout Digital Self Portraits Surrealist Techniques Features of the Face Bilateral Mirror Activity Gees Bend Art Lesson Arts Assessment Favorite Fall Lessons Chicano Artists Art Materials Guide IB Process Portfolio What is Art? Pattern Design Figure Drawing |



 RSS Feed
