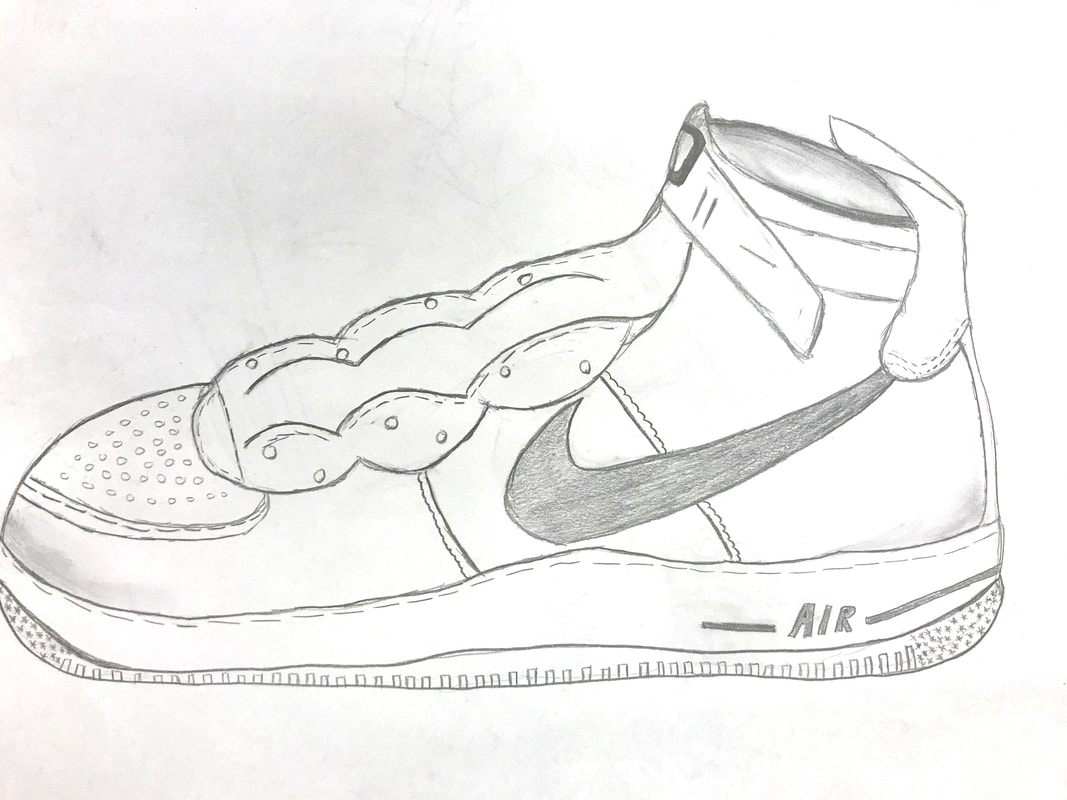
Contour Shoe Drawings for BeginnersContour drawing is a foundational lesson in any drawing curriculum it is also one of my favorite skills to teach. The word contour comes from the French for "outline." It is a type of line drawing where the artist focuses on the edges or outlines of a form. To start Contour Drawing in my classes I like to show examples of contour drawings and explain how they are used in art and design. If you would like to access the slides that I use for this lesson here are the Contour Drawing Google Slides I use. Please make a copy to your own drive to be able to edit to suit your needs. What are the three types of Contour Drawing?There are three classic contour drawing exercises that artists use to hone observation skills. The first exercise is called Pure Contour drawing (also commonly known as Blind Contour), where the artist looks only at the subject and not at the paper. I prefer the name "Pure Contour" over "Blind Contour" because blind makes it seem like the artist shouldn't look at the subject or draw with eyes closed, and this is confusing for students. The word pure relates to the pure observation the artist engages in by only focusing on the subject and not the marks that are created on the paper. These drawings are distorted and often there is a change of scale across the drawing and areas where the drawing shifts because the artist picks up their drawing tool and places it back in a new place. The second type of contour drawing exercise is called Continuous Line drawing, where the artist uses one continuous line to represent the edges/textures of the form and does not lift their drawing tool. This results in lines that not seen in the subject but that bridge areas of the drawings. While the artist is allowed to look at the paper, I encourage my students to limit this to quick glances and to direct 80% of their focus on the subject. The third exercise is a Regular Contour Line drawing where the artist can lift the drawing tool and look at their paper but all edges/textures must be represented with lines. I encourage my students to use a variety of line weights from thick to thin to show dimension and not to rely on shading since it is meant to be a line drawing. How to: Drawing ShoesI really like to use shoes as the subject for my Contour Drawing lessons because they are visually interesting objects with a variety of edges and textures. I have also found that my students who are high school aged are interested in shoes and want to learn how to draw shoes realistically. I have a class set of shoes I use for this activity that I collected from the Goodwill Outlet also known as "the bins" because of the large blue bins where items can be purchased by the pound. I tried to find shoes without partners so that I wasn't taking shoes away from anyone who wanted to wear them. I also tried to find shoes with different visual styles and elements. I gave them a quick wipe down before setting up for the lesson. To set up the room prior to the lesson I placed a shoe at the workspace of each student and a few sheets of regular copy paper in front of the shoes. I also put a bin of colored markers (affiliate link) at each table for students to use for the contour shoe drawing lesson. Group Blind (Pure) Contour Drawing ActivityThe group pure contour drawing exercise is a collaborative drawing activity and a fun way to start off this unit. I make sure students are sitting at tables with mostly even groups of 4-6 students. Because students will rotate around the table for this activity I make sure students have cleared the space around the tables so no one will trip on backpacks or water bottles while moving around the room. Prior to doing the exercise I demonstrate how to make a pure/ blind contour shoe drawing where I don't look at the paper at all. I use markers for this demonstration so that the marker can glide smoothly on the paper and create a bold line. I think it is really helpful to see me do a pure contour drawing of the shoe and to see it come out distorted and to know if theirs comes out distorted they are still doing it right. For the activity each student in the group chooses a different colored marker and draws the shoe at their seat for 1 min 30 seconds (I use my phone as a timer.) Students should do a Pure/Blind Contour Drawing- no looking at the paper. When the time is up, students should move to the seat to their right bringing only the marker with them and leaving the shoe and the paper at the seat. Then they begin drawing the next shoe right on top of the drawing done by the person before. The resulting blind/pure contour shoe drawings are beautifully layered and are often quite representational of the shoe. It is okay if the drawings all don't line up- if the students are following the instructions to not look at the paper they will not line up perfectly. Continuous Line Contour DrawingFollowing the Group Pure/Blind Contour Shoe drawing activity, I guide students in a reflective discussion so students can share their experiences. Students share their challenges with the activity and anything they found surprising about the exercise. Many students share how they were challenged by not being able to look at the paper, not being able to erase the lines they created and by having to draw on top of other students drawings. After we wrap up this activity students have the opportunity to try the second contour line drawing exercise: Continuous Line Contour. I begin this activity by discussing line weight- and how using a variety of thick and thin lines adds visual interest, movement and depth to their contour line drawings. I give students the opportunity to switch shoes with their table mates or to draw their own shoe (if it isn't too stinky to remove!) before we begin. Students focus closely on the shoe and draw the edges with one continuous line, not lifting their marker and press more lightly or heavily to create the variance in line weight. If it is helpful you might want to set a timer for this activity as well giving students 3-5 min to do this drawing so that students don't rush through the process. Realistic Contour Drawings of ShoesAfter completing the Continuous Line Contour drawing of the shoe students are given a larger 11" X 17" of copy paper to create a more realistic contour drawing of a shoe where they can look at the paper, lift their pencil and erase. Students at this point are more used to looking at their subject more than their papers and less likely to rely on their erasers. I typically show examples and encourage students to draw largely and to use the whole space of the paper including all the details they observe in the shoe they are drawing. If you are interested in more step by step instructions for this lesson check out this Youtube video.
1 Comment
4/9/2025 10:26:49 pm
I am going to use this lesson with my older adults at the senior center that I teach at. I think it is a good lesson for all ages.
Reply
Leave a Reply. |
AuthorI'm a high school/middle school art teacher with 16 years of experience. I'm here to help art teachers free up more time and space in their lives through lesson ideas and ready to go content rich, engaging curriculum. Categories
Syllabus Planning Sketchbook Covers First Day of School Avoid Teacher Burnout Digital Self Portraits Surrealist Techniques Features of the Face Bilateral Mirror Activity Gees Bend Art Lesson Arts Assessment Favorite Fall Lessons Chicano Artists Art Materials Guide IB Process Portfolio What is Art? Pattern Design Figure Drawing Drawing Hands Contour Shoes Negative Watercolor |