Partner Drawing ActivityI came across this really fun partner drawing activity called Bilateral Mirror Drawing on instagram from @artofteaching (Mrs.Moen). The activity is inspired by artist Heather Hansen who uses her body to make beautiful and often symmetrical charcoal drawings. I saved Mrs.Moen's original post and made a note that I really wanted to try this with my new Foundations Studio Art students when the second semester started. I typically start the class with an Exquisite Corpse drawing activity but I wanted to mix it up and try something new. I did some research online into this "Mirroring" drawing activity and found a blog post by Shine Brite Zamorano, from Zamorano Fine Arts Academy in San Diego, a K-5 Elementary school, detailing the process of creating a Bilateral Mirror Drawing and it even included a video which was really helpful in understanding the process. I decided to plan out this activity as part of a larger discussion about the Elements of Art and as an opening activity for our upcoming abstract art project: Quilts of Gee's Bend inspired collages. 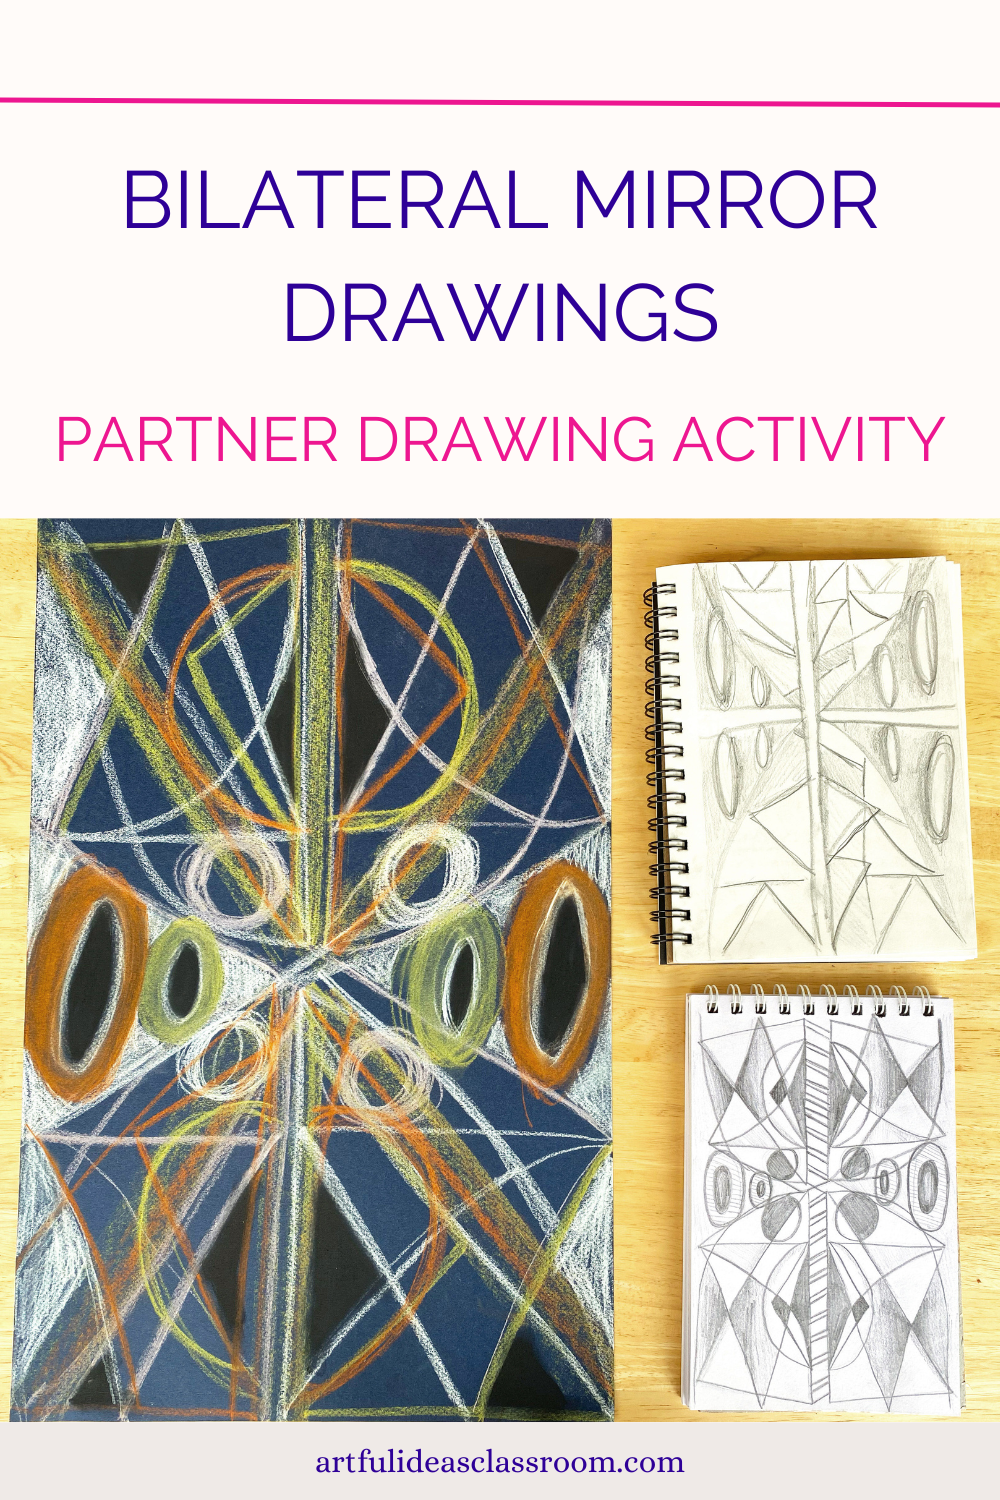 Setting Up Partner Drawing ActivityTo set up this activity I cut 19" X 25" pastel paper in half to give me 19" X12.5" sheets, the type of paper I have on hand is this Canson Mi-Teintes Pastel Paper. I only had dark blue and green and I thought the darker colors would look great with lighter colored pastels. I set up a materials table with the papers and a variety of chalk pastels, oil pastels and charcoal. I also tore several small pieces of blue painters tape so that students could tape their papers to the tables. 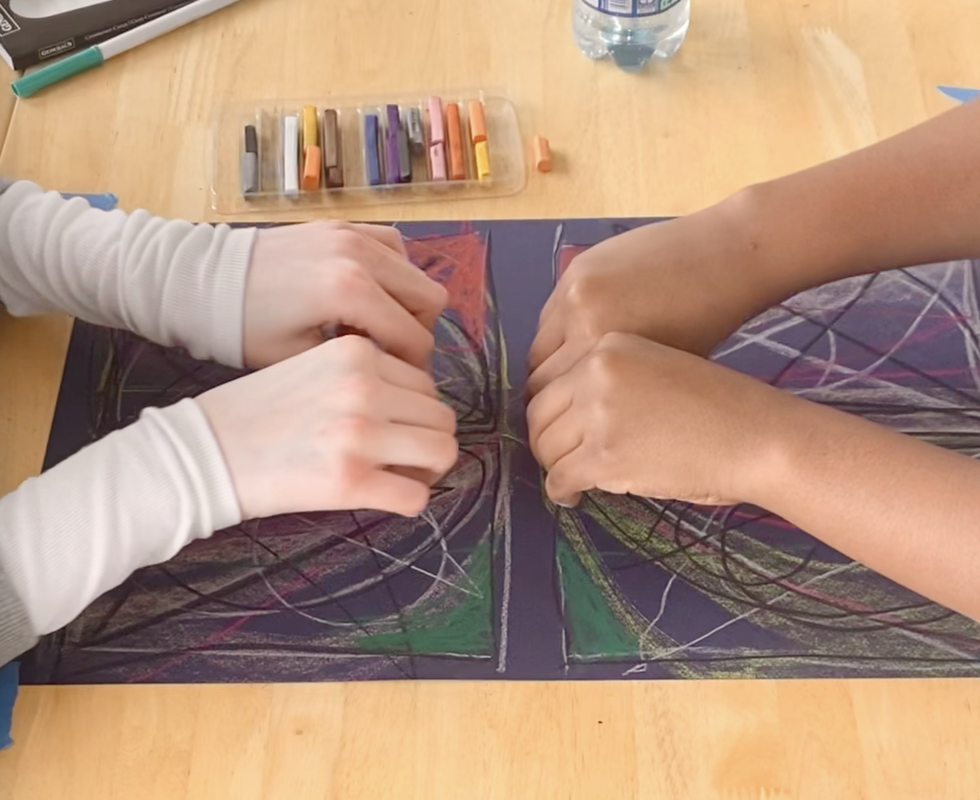 To introduce the activity I showed students the work of artist Heather Hansen who uses her body to make symmetrical drawings with charcoal. I also had them practice the bilateral movements without drawing materials (a fancy way of saying we moved our arms around). First they copied my movements and then they copied the movements of their partners. This activity came after a getting to know you game where they talked to their partner to find something in common then they introduced one another and shared that thing they have in common with the group. Students sent one partner to get the paper and tape (in one area) and another to pick out drawing materials. Then they taped down the paper. I told them all to wait for me to get them started on the drawing so that they all could start at the same time. Before they started drawing I directed the students sit up straight in their chairs and do some shoulder rolls to loosen up then they began the process of mirroring each other. I typically do these group directives before drawing because it helps students focus and it allows me the opportunity to repeat directions for anyone who didn't hear them the first time.  Mirroring Partner Drawing ActivtyOnce students began the room got very quiet. Students took turns mirroring their partner and then switching. Some students communicated what they wanted to draw before they started drawing. I didn't discourage them from doing this because I wanted them to take the activity where they wanted as a partner group. Once students created the lines I encouraged them to add more elements, like filling in areas or layering textures. The whole activity took the students about 30 min until they felt their drawings were complete. Here's a video with some highlights from the process with my classes. After students were done they removed the tape and cleaned up the materials. After class I sprayed fixative on all the pastel drawings so they wouldn't smudge. 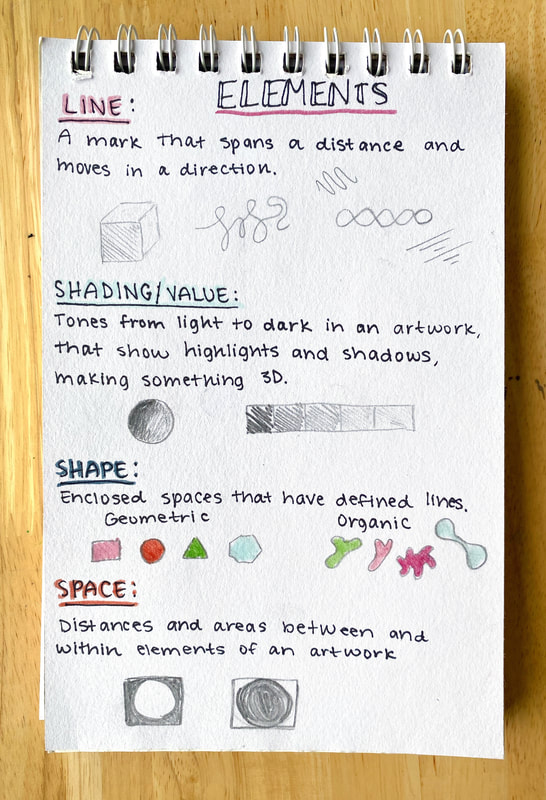 Elements of Art Review Follow Up ActivityThe next day in class after the Bilateral Mirror Partner Activity I reviewed the Elements of Art with my students. I showed them this Elements of Art Presentation (Free Resource) and I told the students to take notes in their sketchbooks. We paused and talked about the artworks in the slides in partners (the slides that have only one artwork) and I led students through Project Zero's Thinking Routines to visually analyze the artworks with a focus on the Elements of Art that students noticed in the artworks. We discussed what Elements of Art are Dominant and Subordinate in a work of art and students shared their ideas with their partners. I passed back the Mirror Drawings from the previous lesson. Students looked at their drawings and identified the dominant and subordinate elements in their drawings and then they created a mini composition in their sketchbooks in which they emphasized different elements. For example if Color and Line were dominant in their drawing they might choose Value and Shape in their sketches. Each student created their own drawing and could choose different elements than their partner to focus on. This activity gave students the chance to review the Elements of Art and also to do some observational drawing. It was helpful for me as a teacher because these were new students and it gave me a chance to assess their skills and experience level as well as making sure that every student had a baseline understanding of the Elements of Art before we moved on to the Quilts of Gee's Bend Lesson which focuses on the Principles of Design. 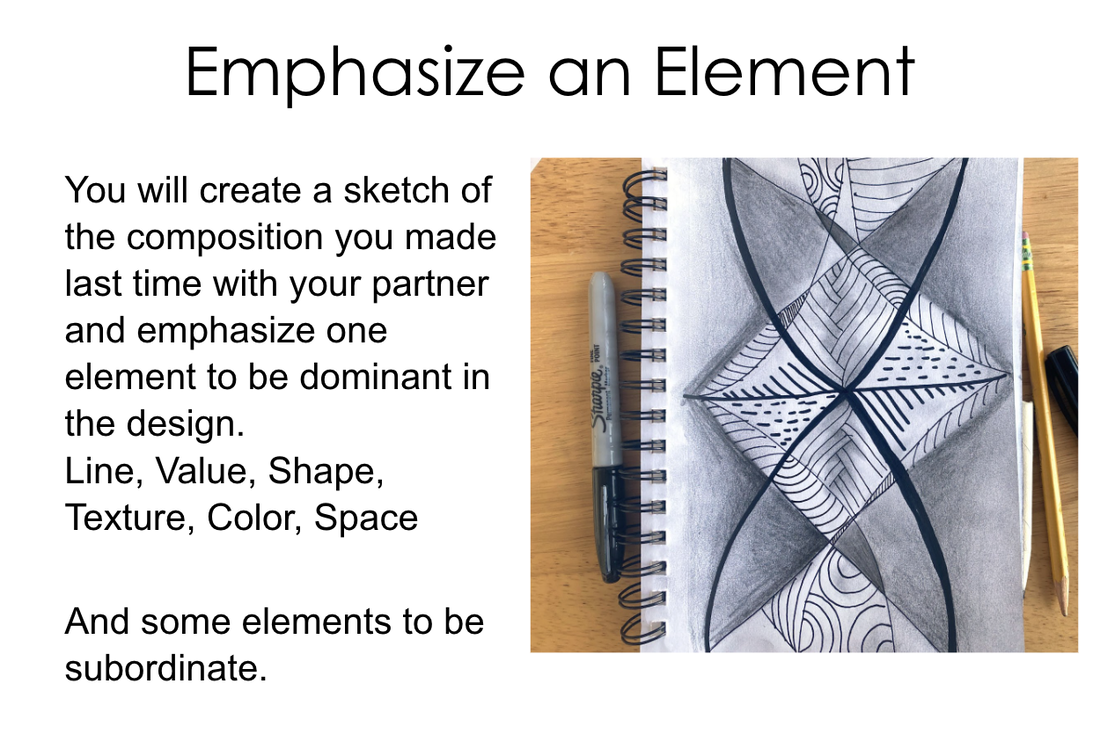 For this activity I put out a variety of materials for students to use in their sketches including fine/extra fine sharpies, drawing pencils, tortillions, markers, colored pencils, rulers and shape stencils. this was also a way for me to assess the students familiarity with different techniques and I demonstrated how to use a tortillion for the entire class over my document camera because so many students were unfamiliar with the drawing tool. At the start of the semester with new students it is really helpful to have time to observe students and learn about their experience levels. I also had the opportunity to walk around and get to know students more during this low stakes activity. 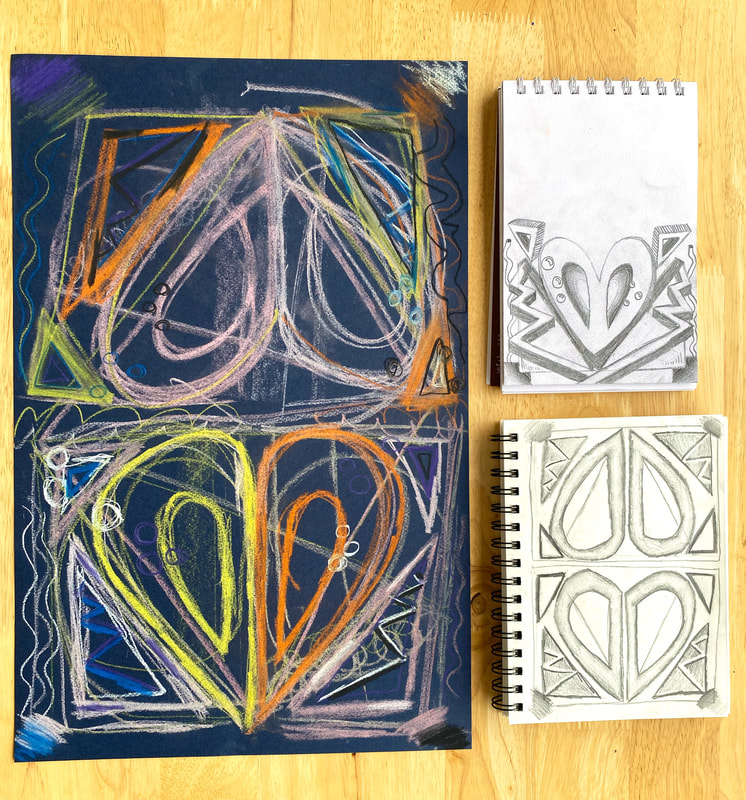 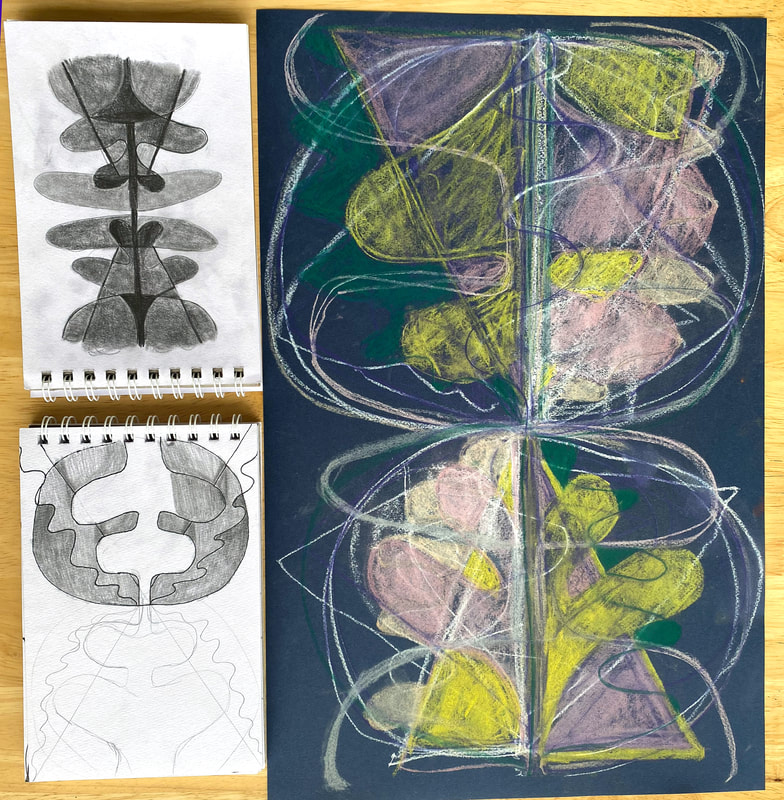
1 Comment
Black History Month Art LessonThe first time I saw the Quilts of Gee's Bend, Alabama was in in the Summer of 2006 I had just started a job at the De Young Museum in San Francisco gift shops. The Quilts of Gee's Bend had been on display for several months at that point and I had sold several postcard sets featuring the unique improvisational patterns but I had not yet seen them in person. So the next time I was posted in the Textiles Gallery I planed to take my 15 min break to visit the exhibition of the quilts. Few artworks have effected me emotionally and spiritually the way seeing those quilts for the first time did that day. I was in a stage in my life when I was feeling particularly distant from my lifelong passion for art. I was doubting my decision to go to graduate school in San Francisco. As a country girl in a big city, the vocabulary and pretense around discussions of art was off-putting to me. Seeing the hand stitched surfaces, the pieces of denim and khaki that I knew came from the work pants and church pants of sons and husbands all bound into astoundingly complex abstract compositions touched my heart that day; the quilts made me remember why I loved art. Over the years I have shared the Quilts of Gee's Bend with my students as examples of composition design or color scheme but I really wanted to create a lesson that focused on the history and tradition of quilt-making in the region and use the quilts to teach my students The Principles of Design.  History of Gee's Bend AlabamaGee’s Bend known officially as Boykin is a community in Alabama that is situated in the bend of the Alabama River. Because of this there is only one major highway into the town. The land was part of the Native American Creek Federation before European colonizers arrived.  Gee's Bend, Alabama Public Domain In 1816 a land owner from North Carolina named Joseph Gee bought the land and started a cotton plantation bringing along 18 enslaved African Americans. When Gee died he left the land to his nephews and they sold it to Mark H. Pettway in 1845 who held the land during the Civil War and Emancipation. Several of the quilt artists that still reside in Gee's Bend have the last name Pettway because their ancestors were enslaved during this period of the town's history. After the emancipation, most of the formerly enslaved African Americans stayed on the land and worked as sharecroppers. In the 1930s the community faced economic hardships and the owners of the land the de Graaff family sold the land to the US Government. The land was divided up and “Roosevelt” homes were erected for each family in the area, giving African American inhabitants control of the land. During this time the Red Cross and FSA photographers including Dorothea Lange visited the area to distribute rations and bring awareness to the economic struggles of the families of Gee’s Bend. In 1949 a post office was established in the town and it’s name was officially changed to Boykin although the community is still called Gee’s Bend locally. Source  New and old home of Clay Pettway. Gee's Bend, Alabama Public Domain The Quilts of Gee's BendThe tradition of quilting in the Gee’s Bend region goes back to the time of slavery when enslaved black women pieced together pieces of fabric to create warm blankets for their families. The techniques, patterns and methods were passed down for generations as a necessity to keep families warm especially during times of economic hardship when fuel was scarce. Some Gee’s Bend quilters have a connection to the Women’s Alberta Freedom Quilting Bee in neighboring Alberta, AL which was started during the Civil Rights era as a way to bring economic development to the area around quilting. Gee’s Bend quilts are unique in style and are created using a quilt frame and hand sewn by a group of quilters. 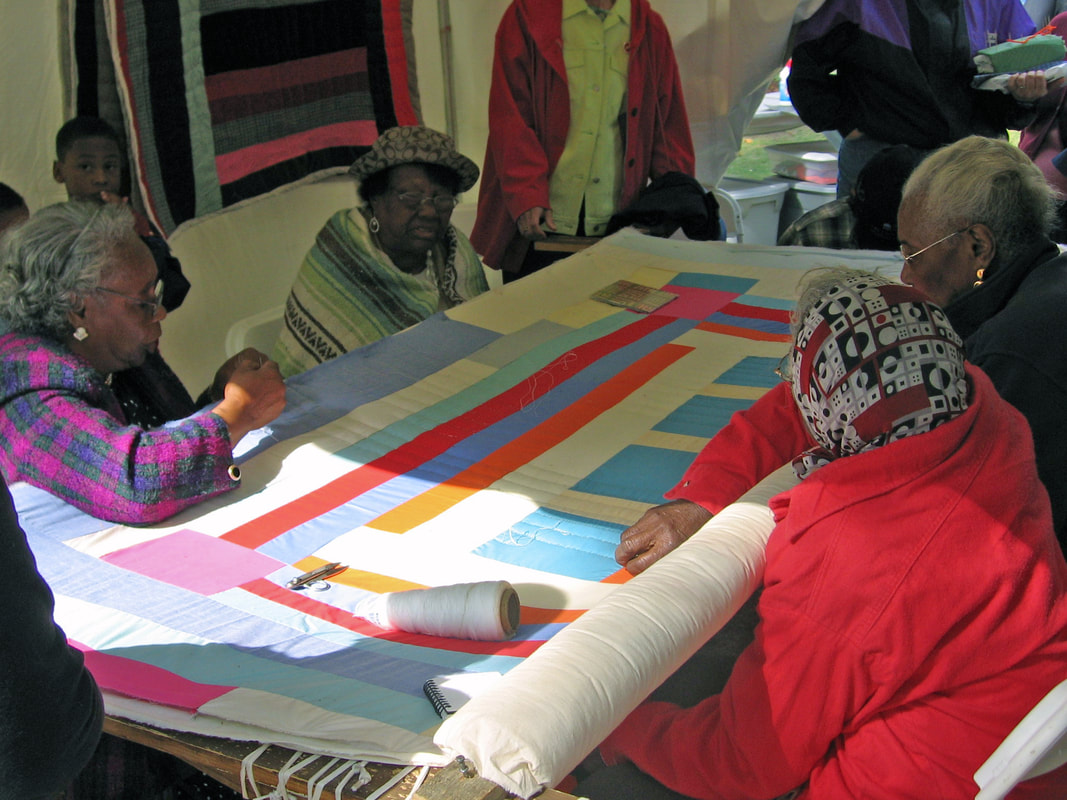 Women from Gee's Bend work on a quilt during the 2005 ONB Magic City Art Connection in Birmingham, Alabama's Linn Park. Gee's Bend quilting bee Date 23 April 2005, 14:55:43 Creative Commons Attribution 2.0 Generic The quilts of Gee’s Bend and Alberta were known locally since the 1960s but the quilts were brought to national attention in the 1990s when an Atlanta art dealer William Arnett purchased several Gee’s Bend quilts for an exhibition. The unique complex patterns and improvisational color schemes drew the attention of curators and the quilts traveled the US for several high profile exhibitions including an exhibition in the Whitney Museum of American Art. Some have criticized Arnett for exploiting folk and outsider artists while others have praised him for bringing these artworks to national attention.  Several of the quilters are now selling their quilts on Etsy. Look for the certified Gee's Bend Quilts logo next to the shop name to make sure that you are purchasing through a verified Gee's Bend Quilter. The Etsy shops were opened through the support of Souls Grown Deep Foundation, a foundation started by William Arnett (the art dealer/collector who first brought Gee's Bend Quilts to national attention) that supports the quilters and other Black Southern American artists. The foundation also offers grants to Black designers and entrepreneurs including a grant of $600,000 in Paskho, the socially responsible, Black-owned lifestyle apparel company in March 2021. Quilts of Gee's Bend Art Lesson SequenceThe goals of this lesson are to guide students to explore the Principles of Design through analyzing the compositions of the Quilts of Gee's bend. Students will also consider how recycled materials can be used to create abstract artworks and reflect on the history and importance of the the Quilts of Gee's Bend.  Teaching the Principles of DesignI created vector illustrations inspired by the Quilts of Gee's Bend to simplify the designs and highlight the principles used by the artists. I also created simple illustrations showing each Principle of Design. I included these more simple illustrations on a worksheet so that students could have something to reference when we learn each Principle. 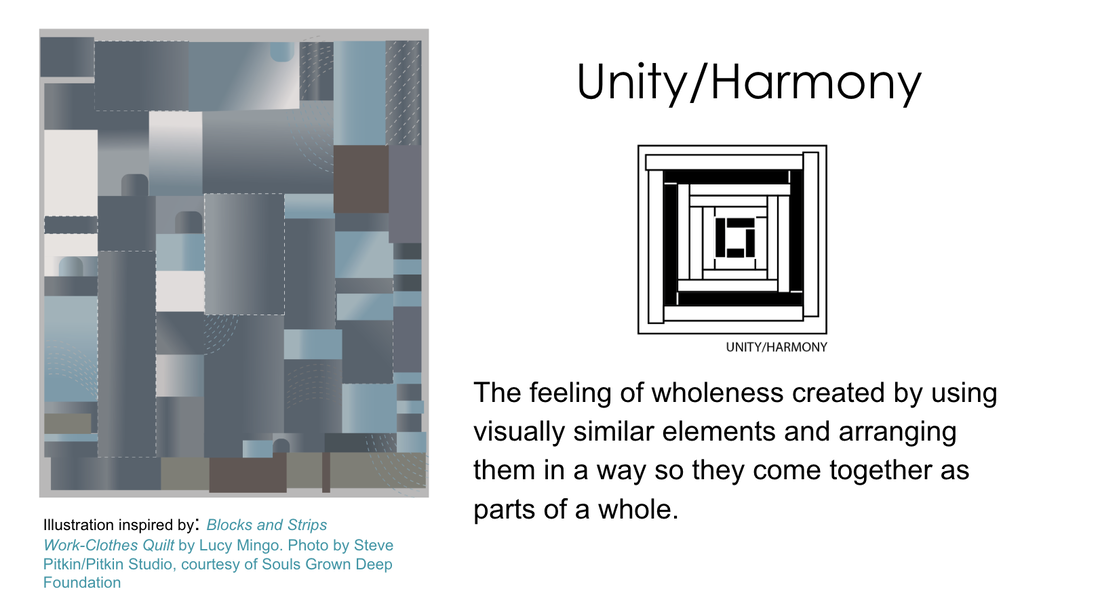 The worksheet also has two areas where students can sketch out their compositions that have guidelines and are proportional to 9" X 12" or 12" X 16" paper. Students can research the quilts for inspiration and use their knowledge of the Elements of Art and Principles of Design to create two design options for their collage. 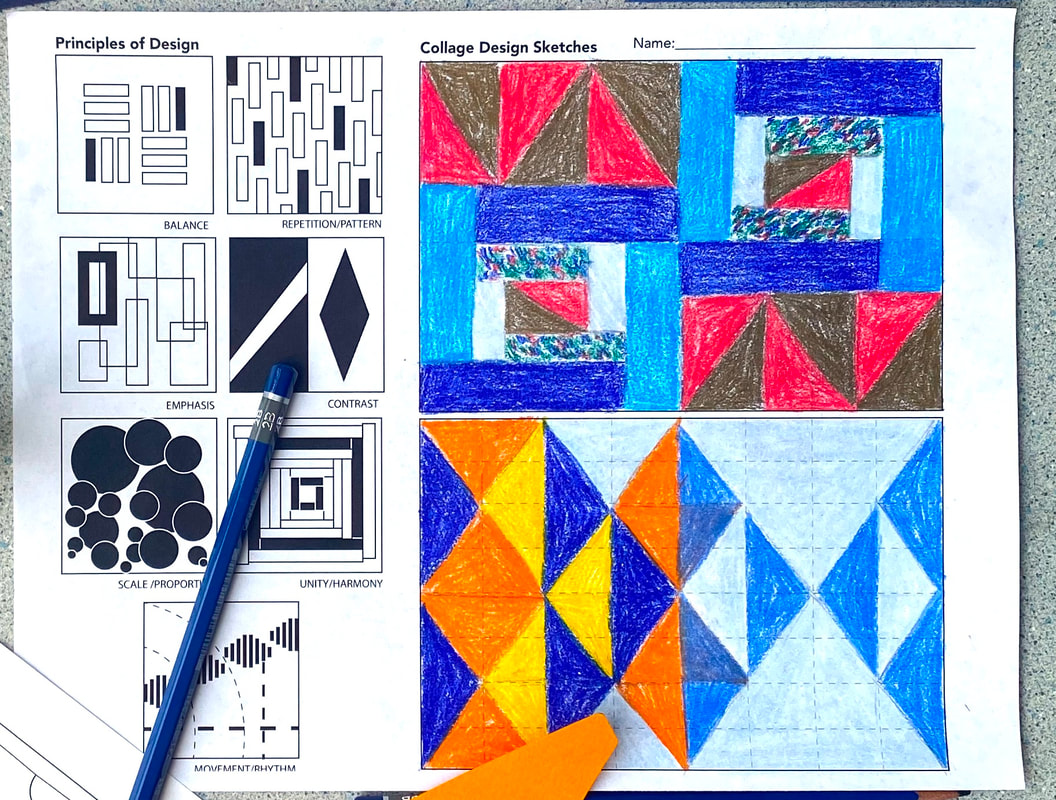 Creating a Quilts of Gee's Bend Inspired CollageIt is important to have a variety of recycled papers available for this project so that students can improvise and use different papers in their design. It is also helpful to have shape cutters (I like these 3 Pack 1" Circle, Square, Triangle punch tools) for cutting small geometric shapes. 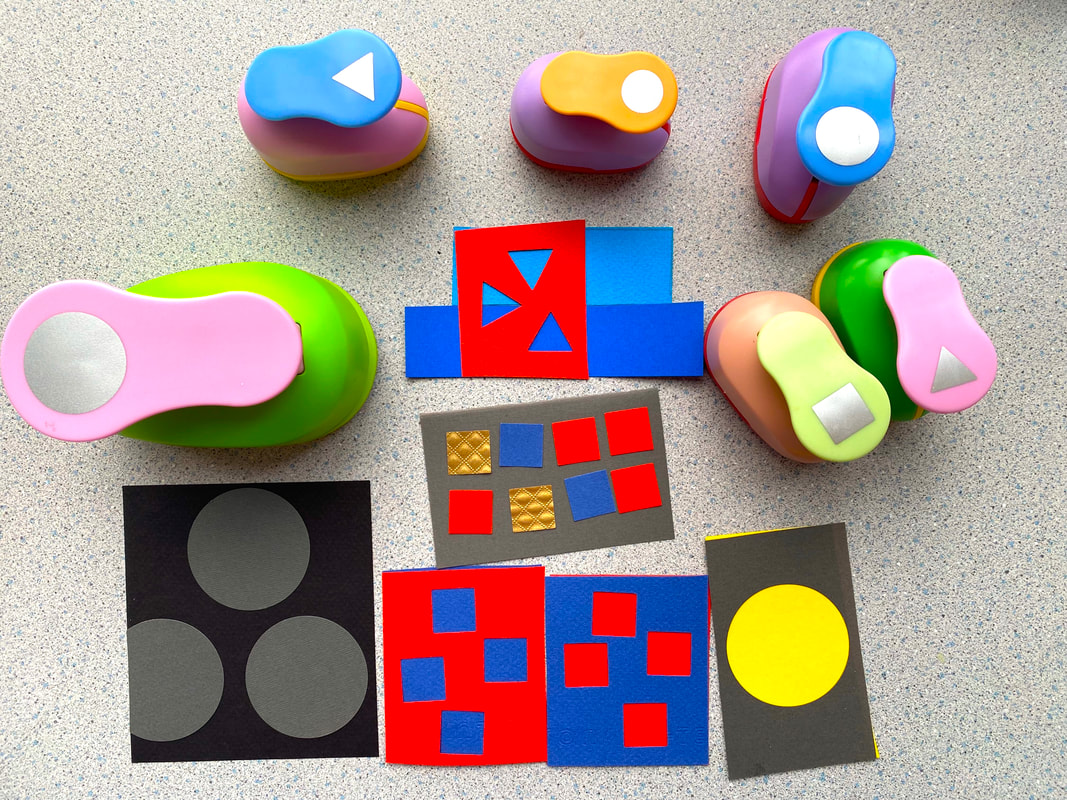 Students can also make their own papers by using art materials to add color and texture to recycled paper they find. Students should also have rulers, compasses and other drafting tools to use to plan out their designs. Students should color their designs using colored pencils or markers. Having the color scheme determined will help them search for a variety of interesting textured/patterned papers to use to fulfill their plan. Collage Process and TechniquesStudents will measure their papers (either 9"X12" or 12"X16") and create the same grid lines that were on the worksheet to help them keep their drawing proportional, then they will sketch out the same design on their larger paper. Using the sketch as a guide they can cut out paper to fit each section of their sketch. A piece of vellum/tracing paper can be used to create a pattern if a shape is particularly detailed/specific. 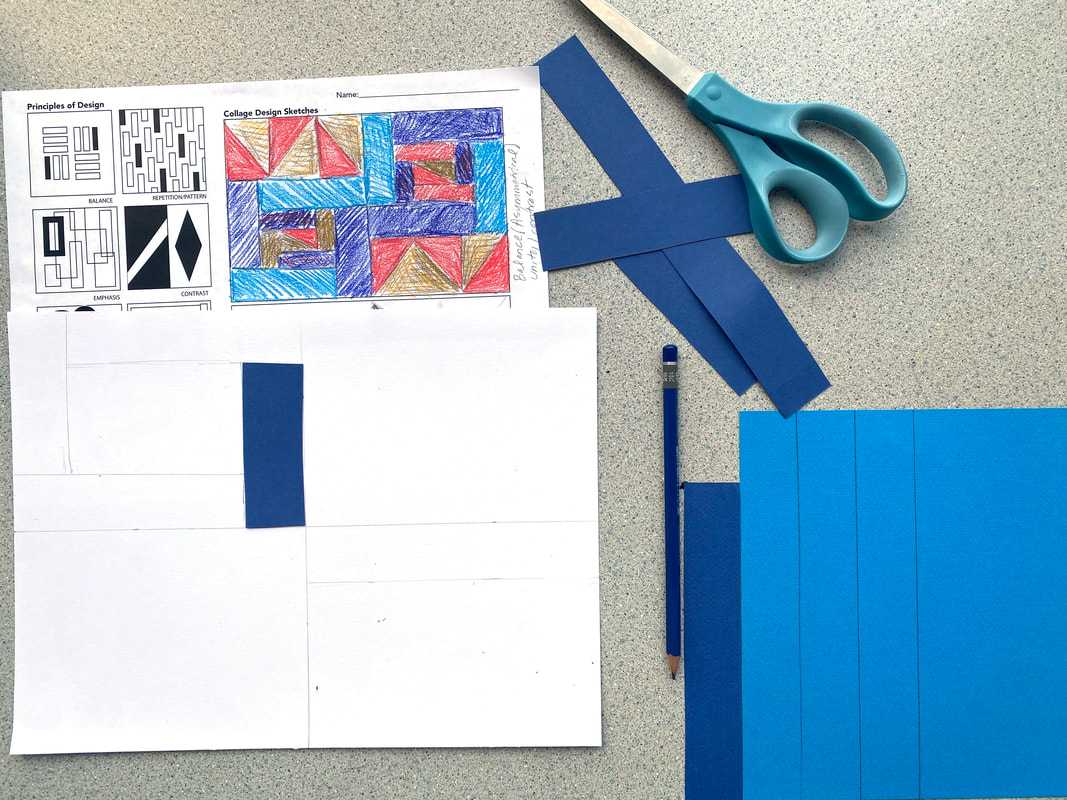 I like to show my students a demonstration on how to glue as cleanly as possible using scrap sheets of paper for applying glue and a clean sheet to help press down the piece being glued down. This part of the process is where the improvisation happens. Students can bring papers from home, search through magazines, use art materials to create textured papers to fulfill the color scheme of their design. The Quilts of Gee's Bend tell a story about the lives of the quilters through the recycled materials used. This project offers students the same opportunity if they use papers that have some personal significance, for example if they are musicians they can use their old sheet music for a section of their collage. 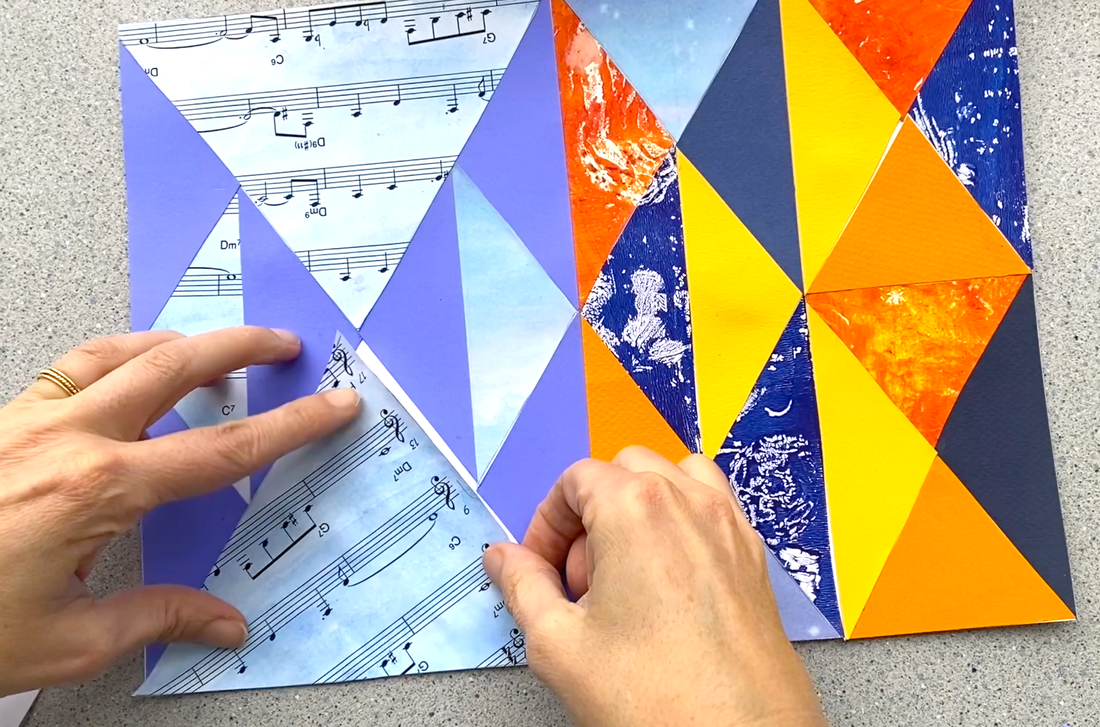 To wrap up this lesson I ask students to reflect on the Principles of Design that are dominant in their collages (stand out) and the principles that are subordinate (less noticeable). I also ask them to reflect on their artistic choices and the personal elements they included through the use of recycled materials. This reflection can be done on paper so students can share their work in a gallery walk or hallway exhibition or on Google Slides so students can engage in a virtual exhibition and critique discussion. If you are interested in getting the full lesson including Powerpoint/Google Slides, worksheet, step by step video tutorial and day by day lesson plans you can click here. Free Quilts of Gee's Bend Coloring Sheet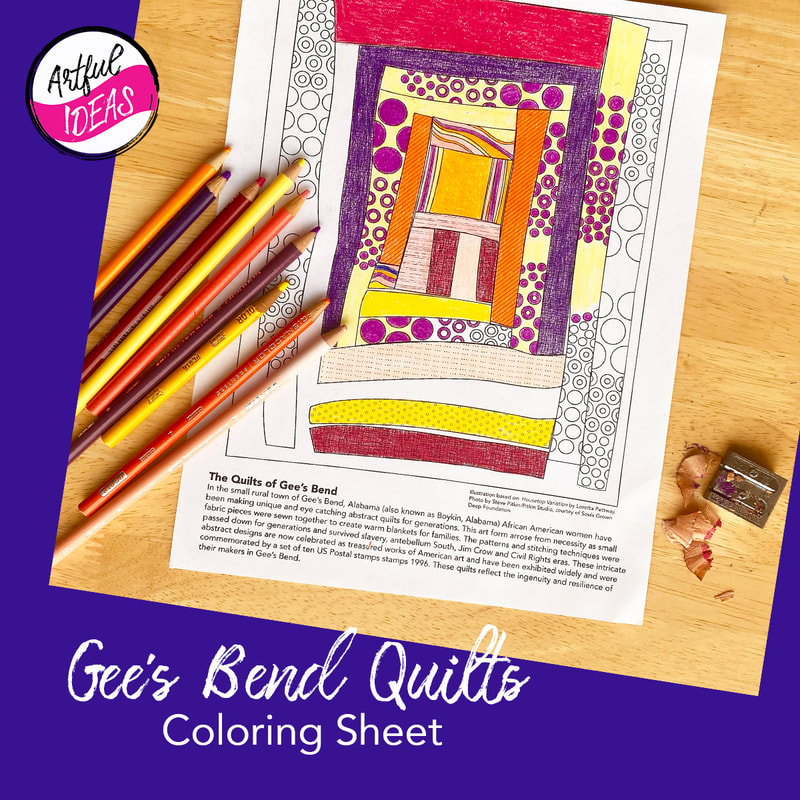 To celebrate Black History Month and the inspiring Quilts of Gee's Bend I created this coloring sheet that you can share with your students. It is a bit detailed so I recommend coloring with colored pencils or thin tip markers.
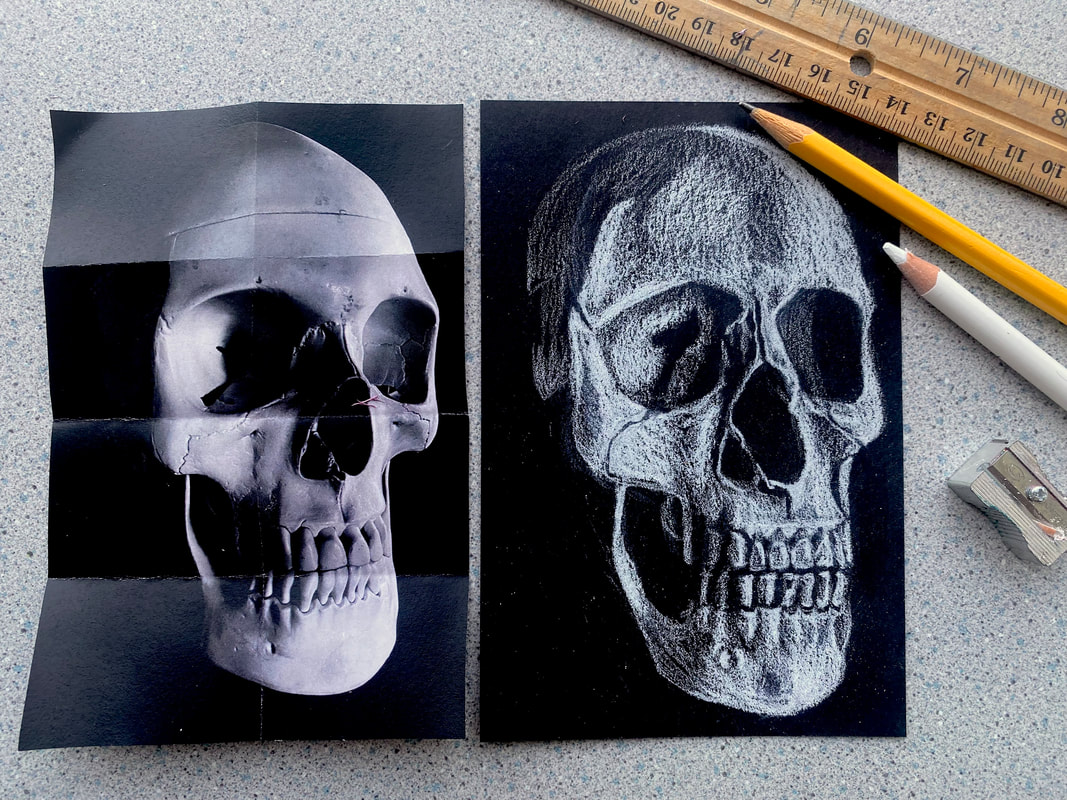
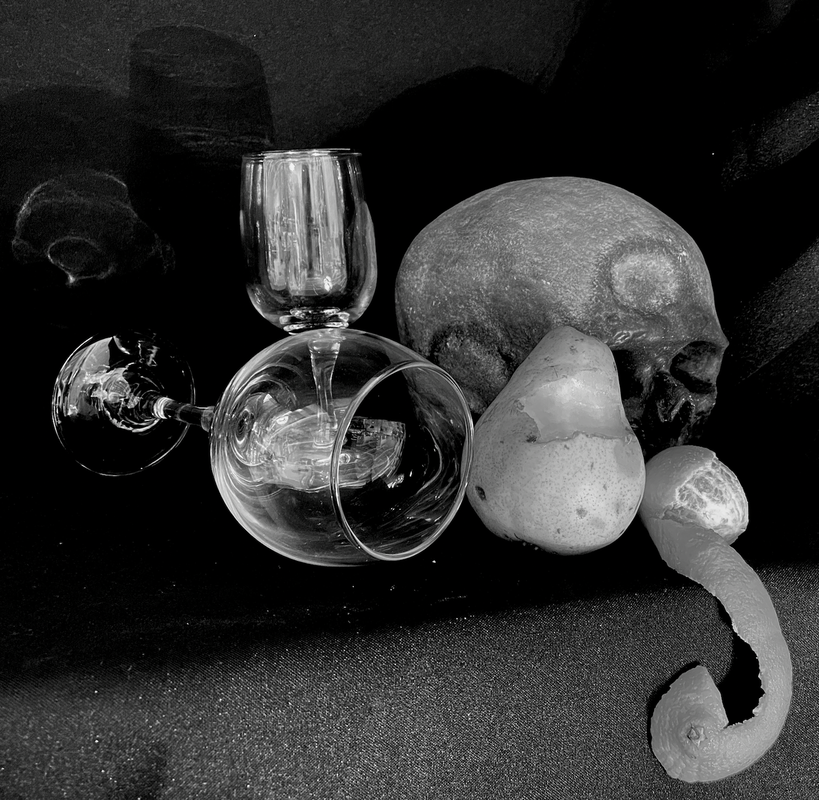
Ways to Approach Assessment in the Arts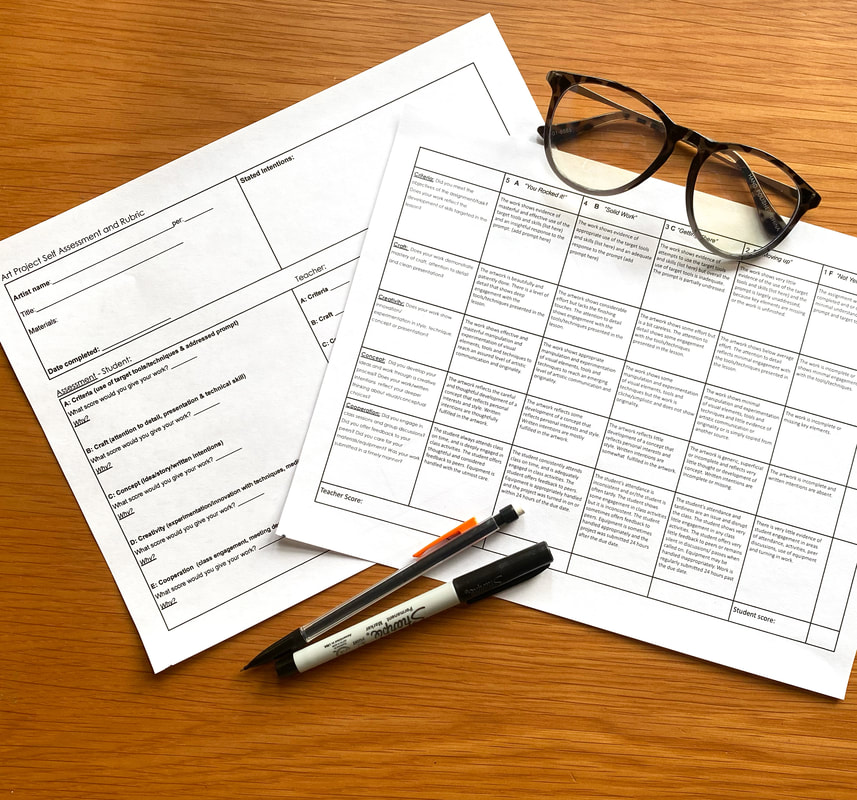 The end of the semester is quickly approaching and I'm planning my final arts assessments for my classes. At my school there is a four day schedule dedicated to assessments and each block is 2 hours so I want to use that time strategically and get the most out of the final day of classes with my students. I have created several different types of summative assessments for the end of the semester including tests, critique/gallery walk activities and slideshow portfolios for my art students over the years and I think they are all valuable in their own ways and work for different groups of students. When designing these assessments it is important to start with the question: What are summative assessments used for? What do you want to learn about the student through this assessment and what do you want the student to learn or understand at the end of the process? All of my assessment strategies are rooted in my rubric. You can find an editable version of my art grading rubric here. Criteria-meeting goals/objectives of the lesson, Creativity-experimentation/innovation in the process, use of the formal elements or concept, Concept-idea, story, prior planning/thought, Craft-presentation, attention to detail and Cooperation-clean up, timeliness, work with peers. Through these summative assessment activities students will be guided to reflect on their performance in class in terms of each criterion. The goal is to see their success as learners of art instead of just focusing on the finished products they created that semester. I want to share my most helpful summative assessment strategies for visual arts classes and describe the process and the ways they have worked in my classroom with different levels of art students. The goal is to help you plan an effective strategy for your students that makes use of the end of the semester assessment schedule. Process Portfolio Assessment Using Google SlidesFor most of my classes (Digital Art, Advanced 2D Art and Foundations 2D Art) I like to assign a structured Final Portfolio assignment on Google Slides that focuses on the process, rather than the finished product. I started using Google Slides for these portfolios during remote teaching in 2020-2021 and I found that this platform worked well because students can easily share their presentations and comment on one another's work. I borrowed this format from the Process Portfolio in the IB (International Baccalaureate) Visual Arts curriculum, which I taught for 8 years. What I like about the idea of a process portfolio is that the focus is on the learning and the creative process rather than the finished artwork. It is also a way for students to reflect on their learning and to see the progress they made in their understanding of art concepts, techniques and their own ideas and concepts. The Process Portfolio my non-IB students create is a much simpler version than what is required for IB but the general idea is the same. Here is the Process Portfolio Template that I share directly with students inside Google Classroom, I just use the "make a copy for each student" feature so that students each have a named copy to edit and submit. The process portfolio includes sketches, smaller class activities and mini projects and longer investigations and multi step projects. Throughout the semester I encourage students to take process photos and screenshots and to save them for the portfolio. I also require students to turn some of these process images into Google Classroom with a written reflection so that they can just download and compile these images later on in the semester. It is key for students to know they have to produce this Process Portfolio for the final day early on in the semester and be reminded of it often so they have all the documentation they need to make a visually appealing and content rich slide. Visual Arts Test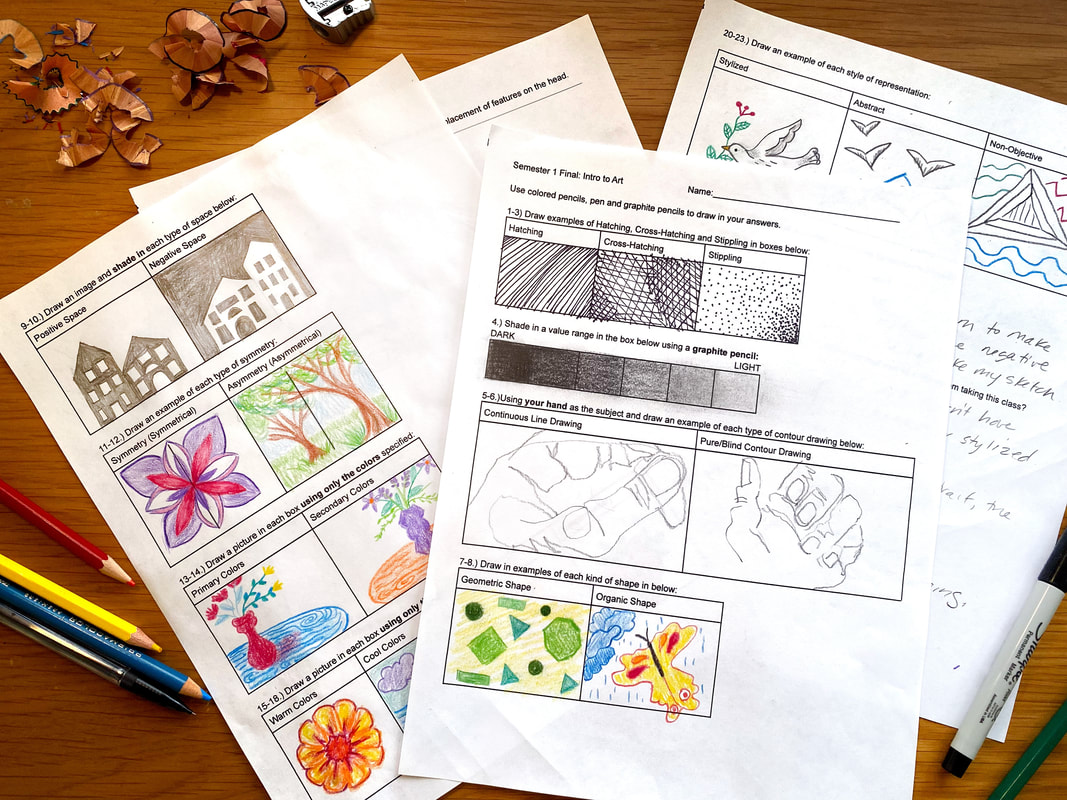 The concept of a testing a student in a fine arts class seemed really strange to me when I first started teaching. In my first year our principal required every class give a summative test at the end of the semester. It also had to be over 30 questions. At first I was annoyed, nothing in my teacher training program prepared me to give a test for visual arts students...as a student teacher I never observed an art teacher giving a test and my master teacher always had a studio clean up during the assessment block and no formal assessment activity. I sulked for about 5 min and then I started thinking about what a test could offer my students. Could the visual arts test give my students a chance to reflect on their learning? Could it help them make visible all the progress they made over the semester? Could it give them time to be creative and actually be fun during a stressful week of back to back exams? The answer was Yes! to all of these questions. My particular group of learners at that point was mostly English Learners and I didn't want to create a language heavy test, my goal was to get students to demonstrate their understanding with as few words as possible. I decided to start with going over all of the concepts that we discussed over the course of the semester and then designed a test that was "draw in the blank" students would demonstrate their understanding through drawing. I followed up these drawing based questions with a few self reflection questions. Here is an editable Intro to Art Test that you can tailor to fit the needs of your students. To prepare for this test I created a game called "review bingo" so that students had practice with all the concepts prior to the testing day. I created a 4"X4" grid and filled in the squares with the definitions of various art concepts/vocabulary that would be on the test. Students cut out these squares and draw an example of the term on the back. So for example if the card said: "a type of shape that is irregular and often seen in nature" the students would draw an organic shape on the back. To play students would put all the definitions face up and then I would read out the definitions in class and as I read one they would turn over their square. Here is a slideshow that I use to teach the students this process. Once a student gets four squares with the drawings face up in a row that student would yell "BINGO!" and I check the drawings to make sure they are correct and then the student can choose a candy or prize (art supplies and mini candy bars). Here is an example Review Bingo Card to give you an idea of how you could make your own.  Gallery Walk and Critique CardsI typically like to have students participate in a Gallery Walk or have a Critique Activity on the day of the final assessment. I like to do a Gallery Walk for intro students to get them used to looking closely at the work of their peers and commenting on artworks using post-it notes. Students are instructed to not use the phrase "I like" and I include several sentence starters on the board as a guide. I also put up posters with the elements of art and principles of design and instruct students to focus on the elements and principles when talking about formal (physical qualities), I also put up some words and sentence starters for talking about the conceptual qualities of a work. Students can also ask a question on their post it note about the artist's process or intentions. Each student gets only 5 post its in a large 35-40 student class or 3 if the class is 20-25 students, that way students have to think about which piece they want to comment on. They also write their name on the comment so there is accountability for what they say and so that the artist can talk to their commenters at the end of the Gallery Walk. For Advanced Students I like to use Critique Cards to guide the critique conversation. This is something I adapted from an activity I learned about at a conference for IB (International Baccalaureate) Visual Arts teachers that I attended in Florida in 2014. I included the full procedure for this critique activity in this lesson resource if you are interested. 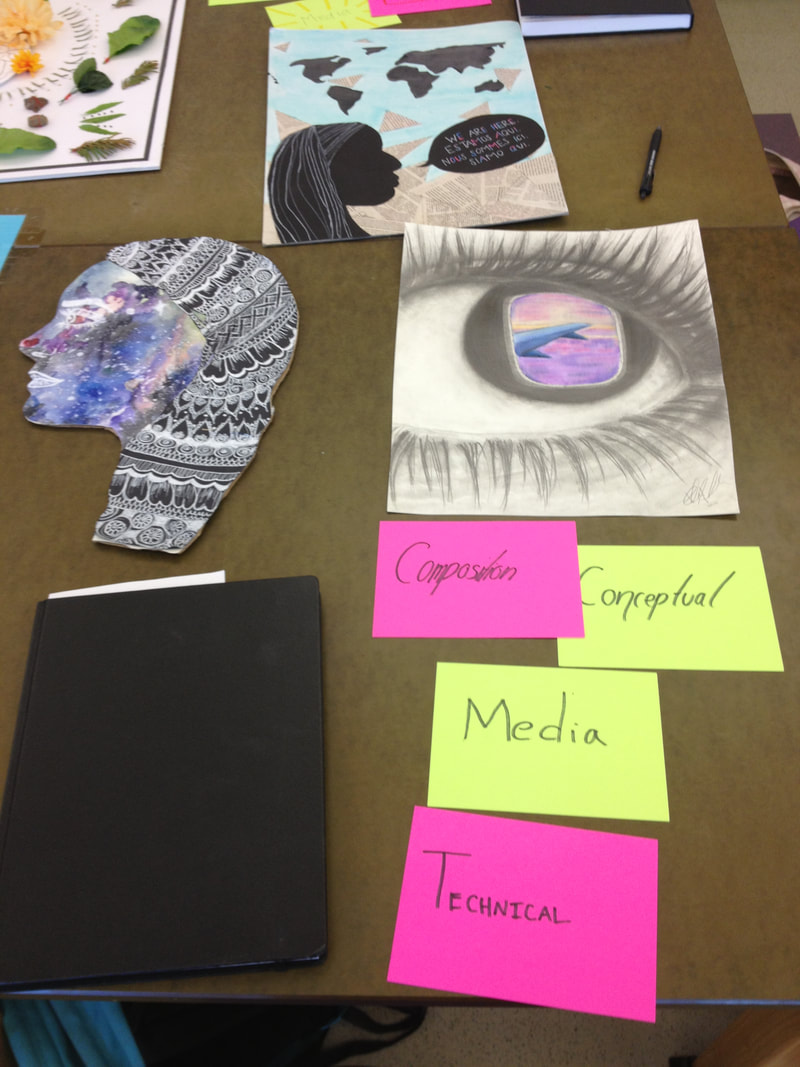 Critique CardsThe critique cards activity requires some prep, each student needs four colored index cards. On one side they will write the qualities they are assessing in each work. These could be your own rubric criteria or you could use the terms seen in this photo: Composition, Conceptual, Media, Technical. Students will need to understand what this means so I typically teach a whole lesson about this at the start of the year and practice this activity at the end of each unit so by the day of the final assessment students understand what each of these terms means and how to describe them when looking at other's work. Students will arrange the cards in front of their own work with what they think is the strongest element at the top. Then during the critique students will move the cards if they disagree with how the artist has placed them and justify their changes by citing evidence from the artwork and written intentions (artist statement). 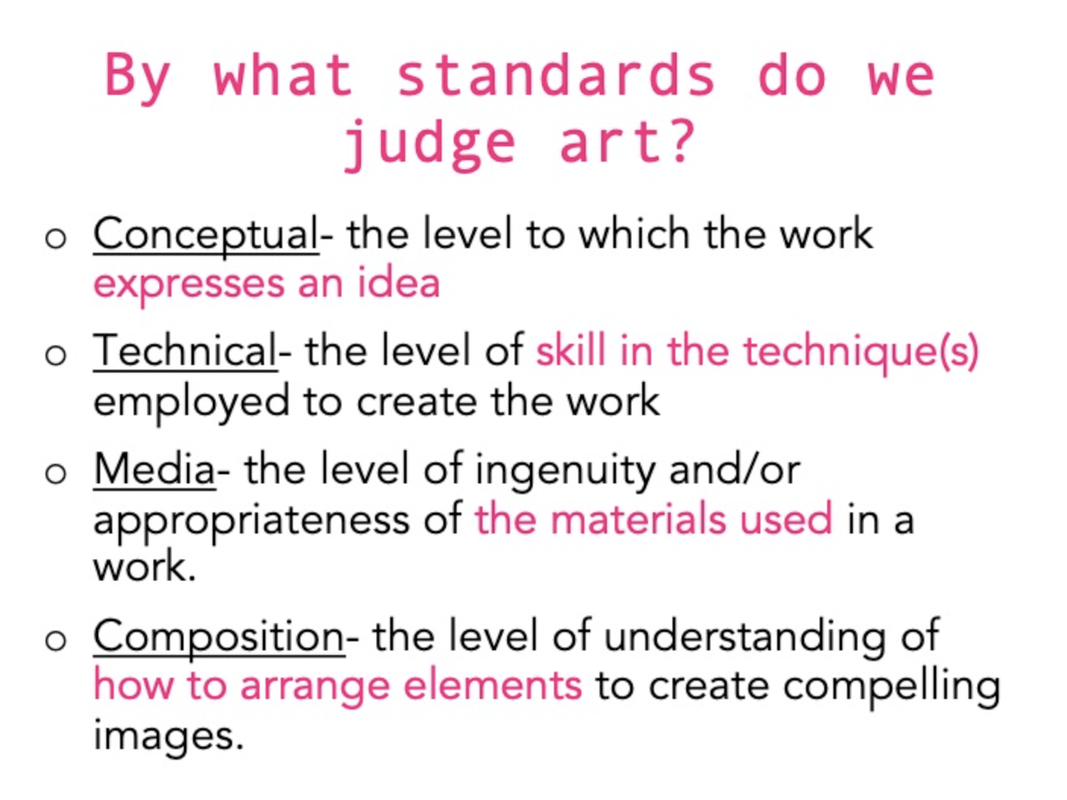 I like this approach because the goal is to be looking at the artwork for its strongest elements, and focus on what is working in piece. This makes the process more constructive and positive without students saying "I like" all the time. Below is an example of how I teach students to understand how to rank these qualities, I like to use examples from Art History that I cover in my introductory "What is Art?" lesson for my Advanced and IB Art students. I have a blog post about this lesson if you want to see more about how I teach students to use Critique Cards for final arts assessment blocks. 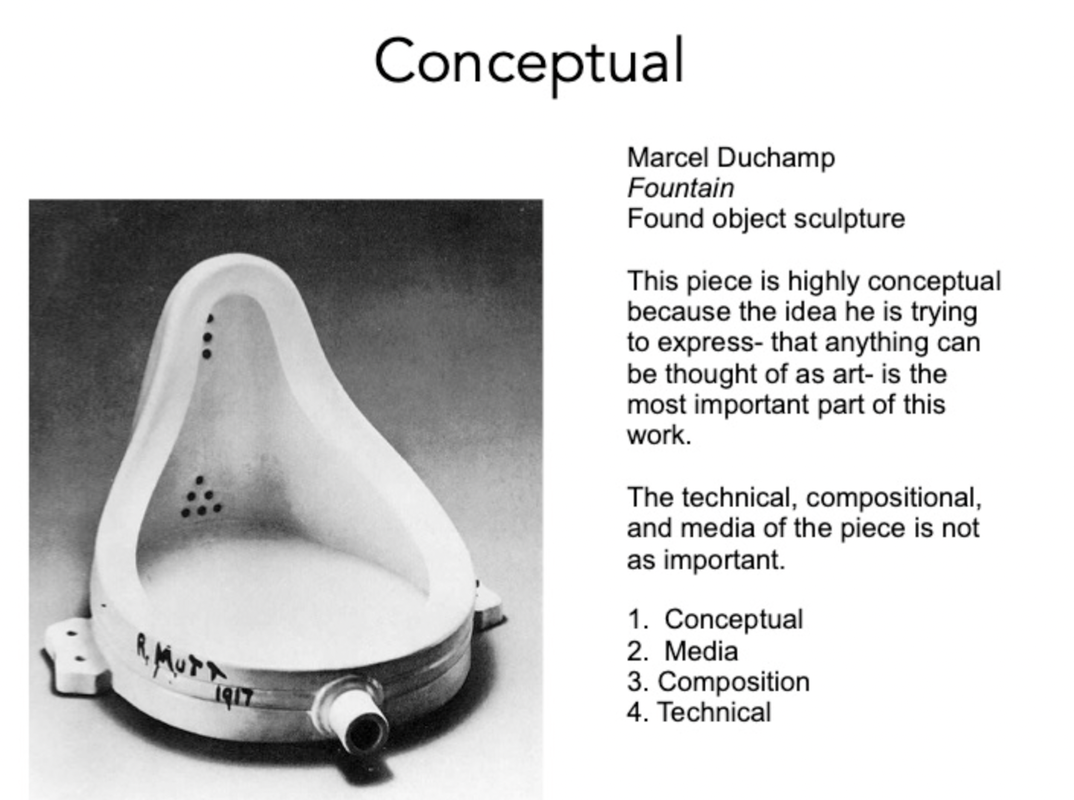 Fall Art IdeasThe days are getting shorter and the nights longer...the final harvests are coming in and the trees are becoming bare. In many cultures around the world the fall is a time to meditate on things that are temporal like the seasons and the fleeting nature of everyday life. This idea of the shifting balance of light and dark (as the days grow darker) always inspires me to turn toward mediums that highlight visual contrasts. This time of year also coincides with Hispanic Heritage Month so it is a great time to explore cultural traditions like Día de los Muertos in Mexico as well as the skeleton imagery of calaveras and La Catrina seen in the work of José Guadalupe Posada. During this time of late September through October I like to focus on two mediums in my classes: Pen and Ink and White Pencil on Black Paper. Pen and Ink Drawing for Beginners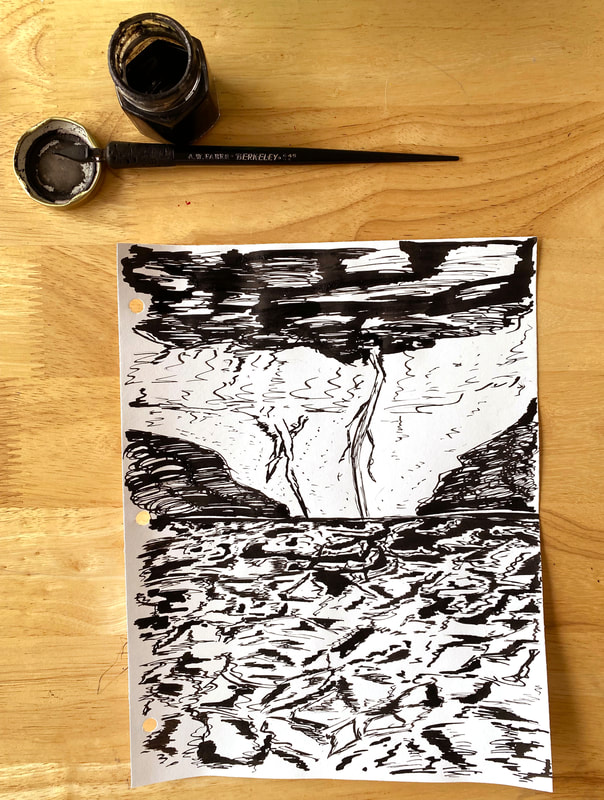 I absolutely love to teach a Pen and Ink Unit with several days of dip pen practice with my intro level students (Drawing and Painting 1 or Foundations Studio Art). I think this is the perfect medium for students early in the school year because it builds confidence with mark making. You cannot erase pen and ink and there is an uncontrollable element when working with liquid India ink. I like to keep the ink in small jars and fill caddies (I get mine from Dollar Tree) for each table with a jar for each student, an assortment of nib types in dip pen holders and paper towels. I start off the unit with exploring expressive line. We look at the landscape pen and ink drawings of Vincent Van Gough and the raw and expressive works of Ralph Steadman. We create our own expressive drawings as students explore the dip pens and the various nibs and the types of marks they can create. Students draw a storm or I have them choose an expressive word out of a bowl at random to inspire their drawings. Then we move on to learning pen and ink drawing techniques: hatching, cross hatching, stippling and scumbling. Students use a few different worksheets to practice these technique in value scales and on solid geometric forms. These techniques are so helpful for pen and ink beginners! I find that this practice not only helps students develop technical skills with the dip pen and mark making but it also gives students the vocabulary to describe what they are seeing in pen and ink artworks. I like to start class doing some discussion (Project Zero Thinking Routines) around artworks using this vocabulary. It is exciting to hear a student describe the intricate cross hatched lines of an artwork! The pen and ink drawings by artist Alphonso Dunn are always student favorites during this unit. Students then embark on their own individual projects applying what they learned in the lesson activities. 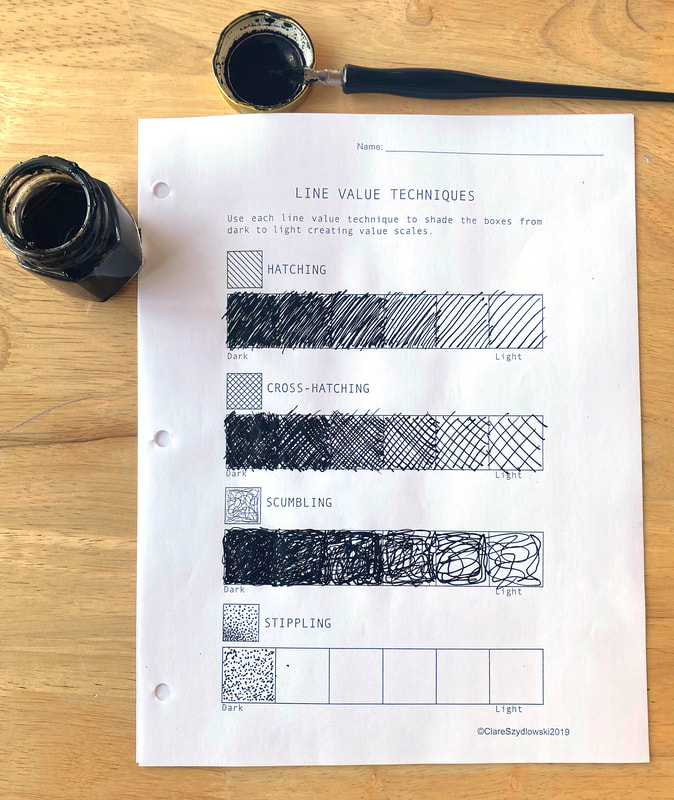 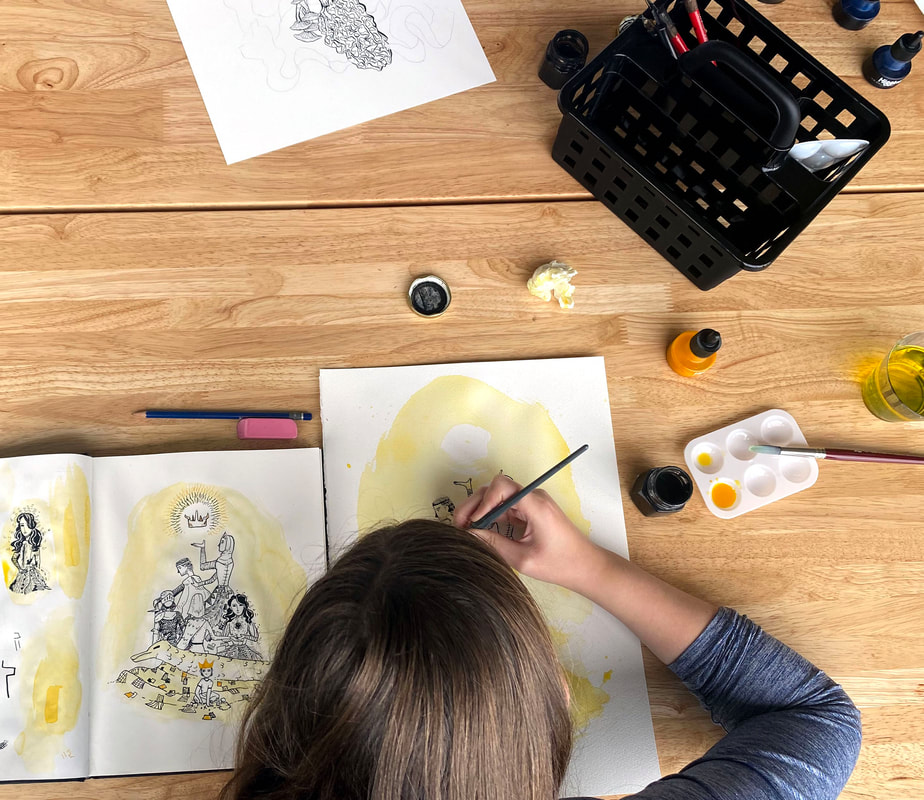 Black and White Still Life Drawing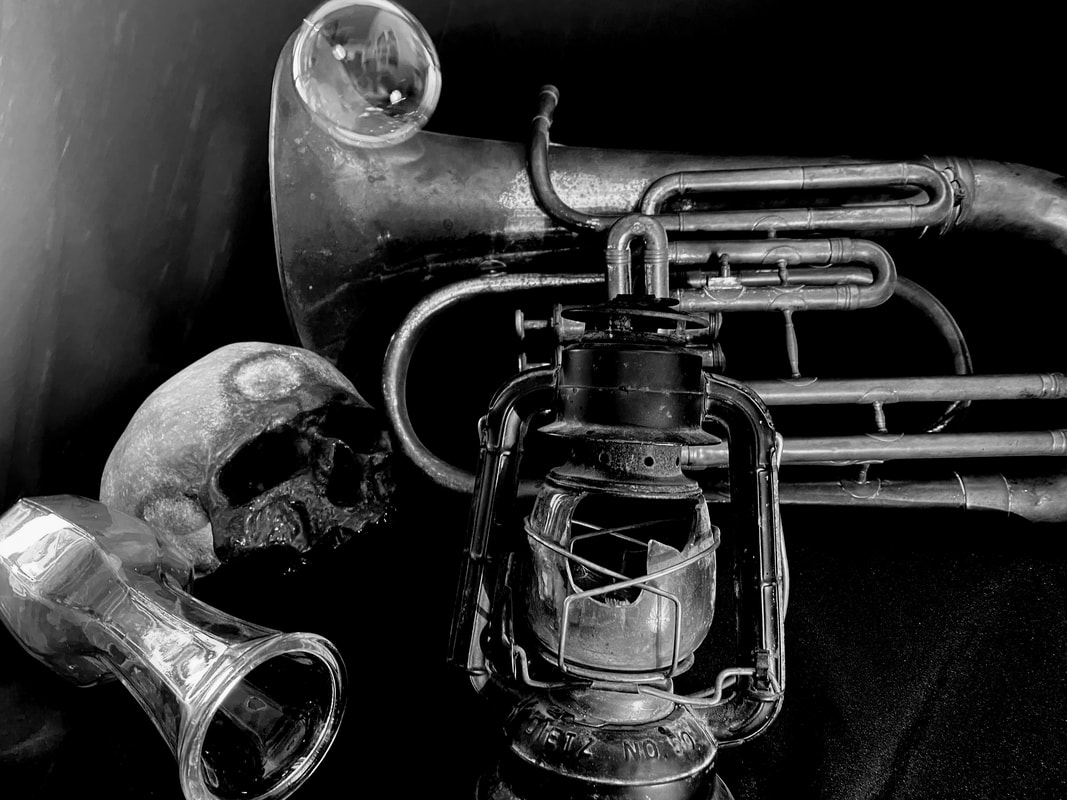 I have always loved Dutch Vanitas Still Life paintings. They often have a dark background that makes the objects in the paintings stand out in contrast. The history of the genre Vanitas is fascinating and the symbolic meanings behind the objects in these artworks offer the possibility for a rich discussion with students. The themes in these artworks center around the idea of "memento mori" or remember your mortality, in other words, all things are fleeting. These themes connect well to the Mexican Día de los Muertos tradition of Las Ofrendas, or altar that is set up with objects with symbolic meanings, as well as La Catrina a well dressed skeleton figure seen in the work of José Guadalupe Posada who reminds us that material wealth is fleeting and "we can't take it with us." Both of these cultural traditions relate to death in different ways and this is something you can explore in discussion with students or they can explore individually in their art journals. This lesson is rich in meaning and gives students an opportunity to explore the question "what is a still life in art?" and to contemplate how everyday objects can tell a story through symbolism. White Pencil on Black Drawing PaperFor this lesson students learn how to draw the lightest values of their reference image which is opposite to how they typically draw (adding dark to white paper). This can be really challenging for students. I like to use Prismacolor Premier Soft Core Colored Pencils on Canson XL Black Drawing Paper for this lesson it gives a really bold white and erases fairly easily. I begin the lesson by teaching students how to create two value scales: one that is 5 steps and one that is a gradient. I typically give students two pieces of 4" X 6" paper one to make the two value scales and one for the white pencil on black paper drawing study. For the study students choose from a group of reference images (I include glass objects and skulls that I photographed and edited to be high contrast). Students use a simple gridding system and graphite pencil to sketch the proportions of the object and then match the values in the reference photo as best as they can using the white pencil. Students will wear down the pencils as they draw so having a handheld sharpener is very helpful, I use these Handheld Metal Pencil Sharpeners.
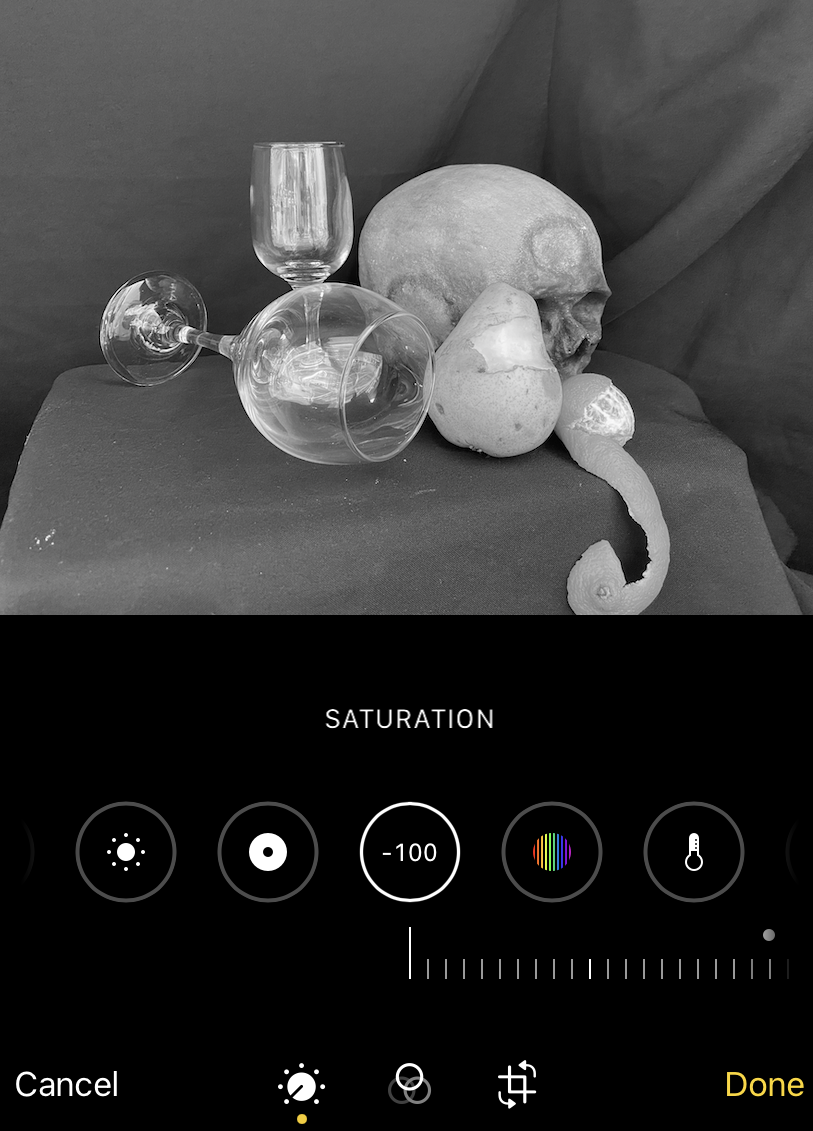
Tips for Still Life PhotographyAfter completing the study students create their own still life and photograph it to use as a reference photo. I create a couple of areas in the classroom where students can set up and photograph the still life. I use black cloth as a background and various size boxes to create risers for objects so they can sit at different heights. I also supply a variety of objects: glassware, replica skulls (I borrow from the anatomy teacher) and any other objects I have laying around that might be good to use. It is also fun to include bubbles so we often have a bubble machine or students blow bubbles for one another while they photograph. But I do encourage my students to bring in their own still life objects that have symbolic meaning for them. The photographs need to be edited to be very high contrast so that they can be drawn with white pencil on black paper. 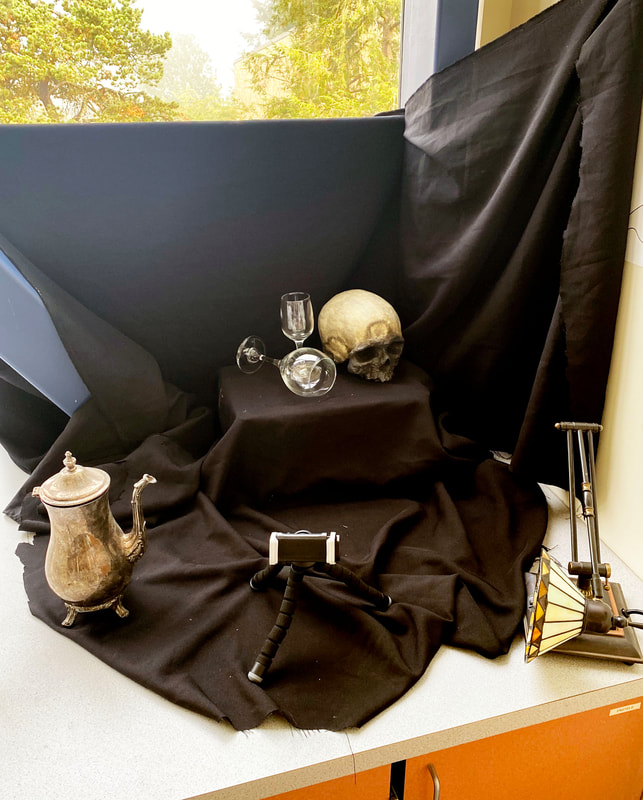 Here is a photo of how I set up the still life photography area, it is also helpful to have a single light source to create highlights and shadows. My classroom has big windows with no shades (hey I'm not complaining!) but it does make it challenging for photographing still lives.
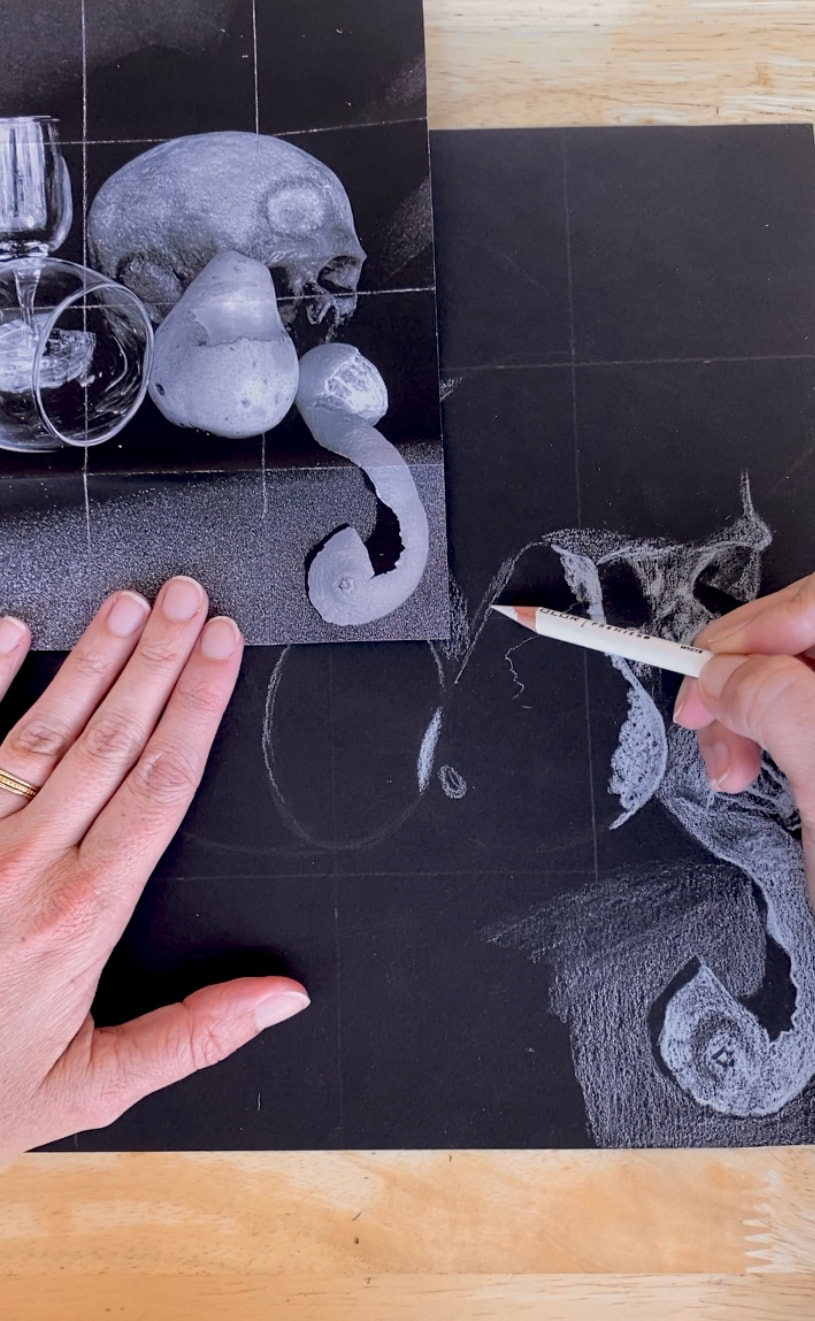 Still Life Drawing TipsI teach my students how to grid their reference image and paper. We do a bit of art math figuring out the proportions of their reference image and cut paper to match those proportions. I have also in previous years made the sizes standard 7.5"/10" reference image on 9"X 12" paper. I tell my students to sketch with graphite before drawing with white colored pencil. These drawings are intricate but I find once students get started they work quite quickly and it usually takes around two 75 min class periods to complete. 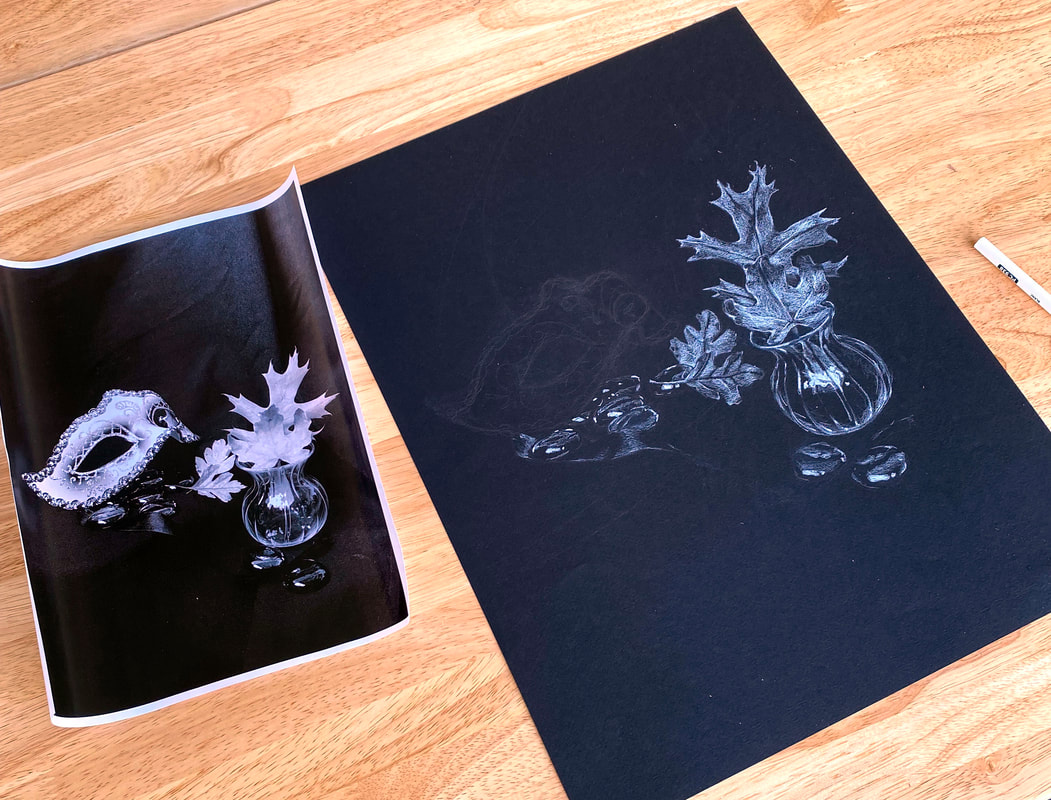 Above: here's an example of a student drawing in progress. 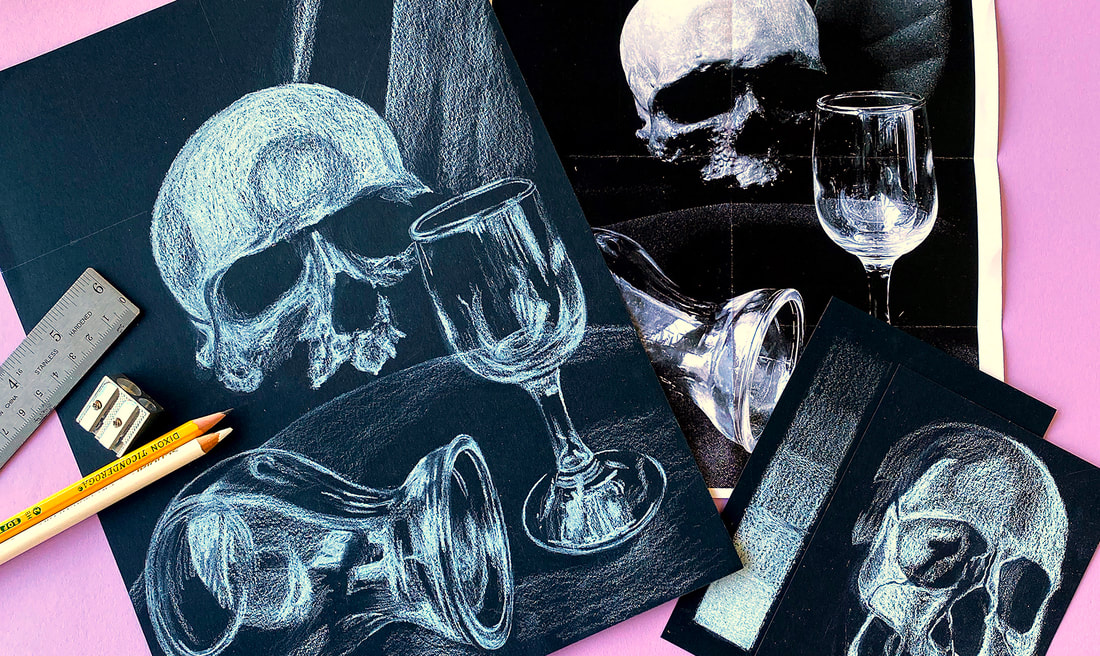 If you're interested in purchasing the full lesson plan with materials list, printable and perfectly sized reference images, slideshow, and extension Art Journal prompts and research activities click here. If you try either of these lessons with your students tag me over on Instagram!
September 15 marks the beginning of Hispanic Heritage Month. This month is a good reminder to explore the rich artistic traditions found across Latin America. I also like to do some class discussions using Visual Thinking Strategies or VTS using artworks from these artists. I made this slideshow you can use with your students for VTS. Some themes to explore with students in relation to these artists:
 César A. Martínez Born 1944 in Laredo, Texas. Prominent member of the Chicano arts movement. Studied at what was then called Texas A&I College, and later Texas A&I University. While a student he became involved in the Chicano movement for civil rights. He is currently based in San Antonio, Texas. His work is known for his figurative works of solitary figures painted in vivid colors. Well known for his Bato/Pachuco/Ruca series. (from cesaramartinez.com)  Carmen Lomas Garza Born in 1948 in Kingsville, Texas. Inspired by her parent’s activism with the American G.I. Forum, Garza joined the Chicano Movement of the 1960s and 1970s. She is a graduate of the Texas Arts & Industry University, Juarez-Lincoln/Antioch Graduate School, and San Francisco State University where she earned her M.A. in 1981. Her narrative paintings depict her memories of everyday life and traditions growing up in a Mexican-American family. (from carmenlomasgarza.com)  Ester Hernandez Ester Hernandez was born in California’s San Joaquin Valley to a Mexican/Yaqui farm worker family. The UC Berkeley graduate is an internationally acclaimed San Francisco-based visual artist. She is best known for her depiction of Latina/Native women through her pastels, prints and installations. Her work reflects social, political, ecological and spiritual themes. (from esterhernandez.com)  Gaspar Enriquez Enriquez was born in 1942 in the El Segundo Barrio neighborhood of El Paso, Texas. He attended the University of Texas at El Paso, graduating with a bachelor's degree in arts education. He then went on to attend New Mexico State University, where he studied metalwork and graduated with a master's degree. He is known for his striking acrylic airbrush portraits.  Charles "Chaz" Bojórquez is a Chicano graffiti artist and painter who is known for his work in Cholo-style calligraphy. He is credited with bringing the Chicano and Cholo graffiti style into the established art scene. He began his art career by tagging in his neighborhood of Highland Park, Los Angeles in the early 1970s. He received formal art training at University of Guadalajara for Art, California State University, and Chouinard Art Institute in Los Angeles (from wikipedia)  Wayne Alaniz Healy Born 1946 grew up in East Los Angeles, where political events in the 1960s stimulated his commitment to execute socially and culturally relevant public art. Known for his murals and scenes of Chicano life and traditions.  Juan Fuentes
Born: Artesia, New Mexico 1950 Juan R. Fuentes is a graduate of San Francisco State University. He has taught at the Mission Campus/City College SF, the California College of the Arts, Oakland CA and was visiting faculty at the San Francisco Art Institute’s print department. Juan was also director of Mission Grafica at the Mission Cultural Center for Latino Arts. Inspired by the Chicano Movement Juan has dedicated his art as a cultural activist to supporting and being part of a global movement for social change. His silkscreen posters and relief prints have addressed many issues as they relate to communities of color, social justice, racism, and international struggles for liberation. (from juanfuentes.com) I teamed up with ACMI (Art and Creative Materials Institute) for this lesson to tell you more about their safety seals. This lesson is perfect for the start of the school year because it is easy and approachable. You can tailor the lesson for students 7th-12th grade. Get the full lesson plan and step by step video tutorial here. 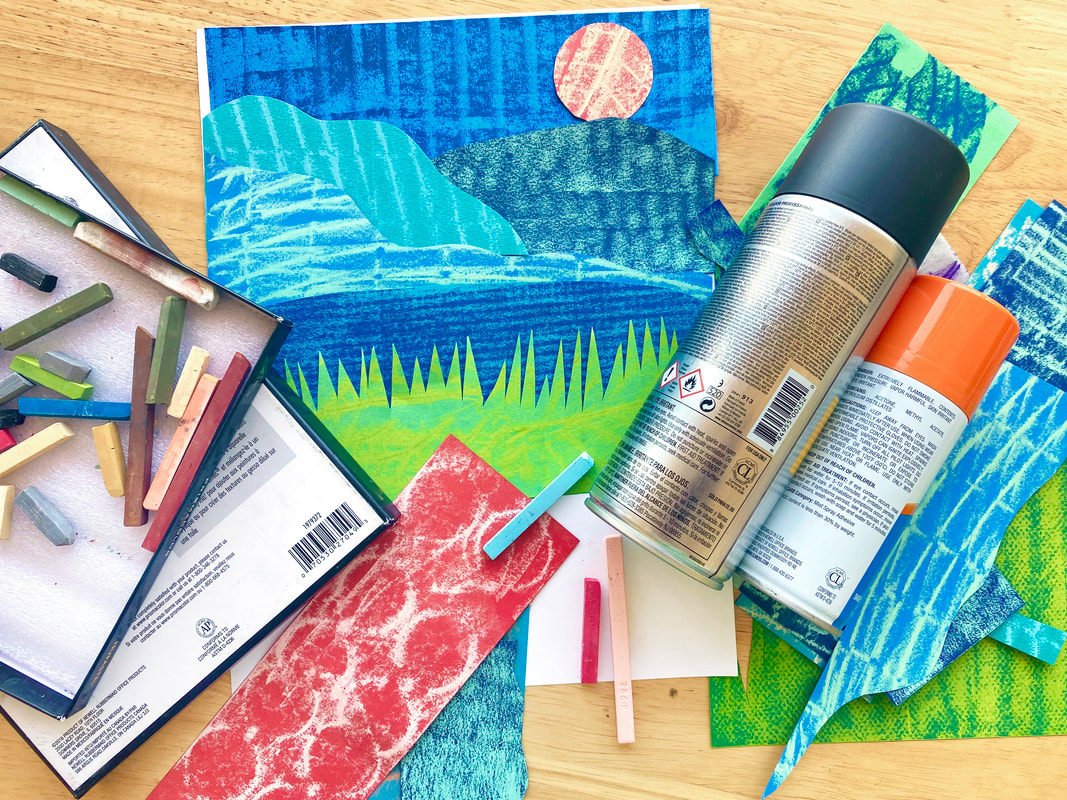 ACMI Safety SealsYou’ve probably seen the ACMI safety seals on the back of your art supplies but you might not know what they mean. ACMI (The Art and Creative Materials Institute) works with board certified toxicologists to test the safety of art supplies. These seals indicate that the materials are safe for consumers when used as directed. The AP (Approved Product) seal indicates that the product is non-toxic when used as intended and can be safely used with children. Look for the AP seal when working with students 6th grade and younger. The CL (Cautionary Label) is for products that can be safely used with students 7th grade and older when used as directed, never use a product with a CL seal with a student younger than 7th grade. I teamed up with ACMI to create this lesson (full lesson plan and video tutorial) for the start of the 2022 school year. Since I’m a high school teacher I designed a lesson for 7th grade-12 grade using both AP and CL labeled products. The seals make it easy for teachers and parents to know that the materials they choose for their students and children are safe. For more detailed information about the safety seals check out the ACMI website. 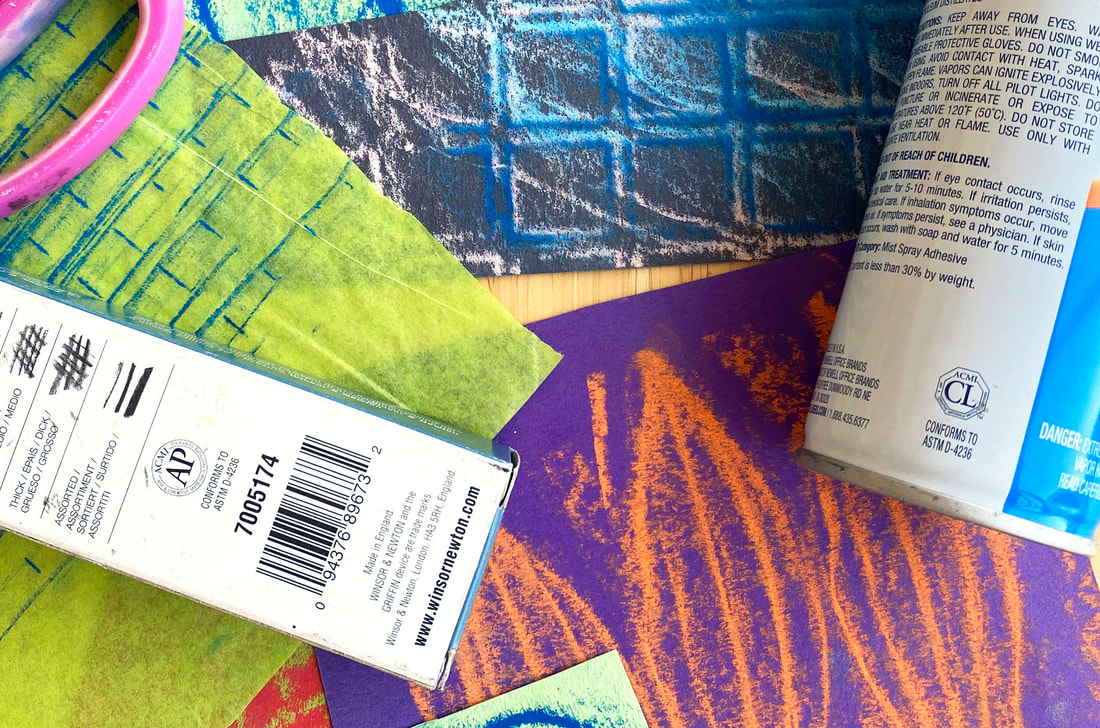 What is Frottage?Frottage is a drawing technique popularized by Surrealist artists of the early 20th century where the artist creates a rubbing of a textured surface using a pencil, crayon or other drawing tool.  Frottage by Surrealist artist Max Ernst Why Chalk Pastels/Soft Pastels for the start of the school year? Chalk (soft) pastels are easy to use, they come in a variety of bold colors and are approachable for beginners because they are similar to sidewalk chalk. I like to use the frottage or rubbing technique because it gets students to see everyday objects in a new way- as textured surfaces they can use in a work of art. This lesson also doesn’t require a lot of specialized drawing skills so even students new to art can feel successful, but it is still challenging for experienced students. Skills Covered in the Lesson:In this easy chalk pastel lesson for beginners, students will learn to notice the textures in objects in their everyday life. They will learn the basics of pictorial space: foreground, middle ground and background and how to use contrast in their compositions to create dimension. This lesson could also be used to explore color schemes. Students will have to plan out their design and work through a process to glue the pieces of their college in the correct order to create the layers of the landscape.  MaterialsHere's a link to the products I like to purchase for this lesson
Free Art Materials Guide This Free Art Materials Guide (that’s the link to download btw) will make this year’s art supply order way easier! This guide has over 130 products organized by art medium and listed by brand name so you can shop around and compare prices. Or if you’re in a hurry, all the listings are quick links so you can just click and order. I’ve included quality affordable options as well as higher end products if you want to splurge. Supply ordering is just one of the art teacher tasks that other subject area teachers just don’t understand.  We aren’t just flighty creatives and our job is not easy… The impossible math of just how many kids might be added to our roster after the first week and what that means for our materials order has us looking like  …at the opening meetings My first few years of teaching I was paralyzed by all the options out there for art supplies. And when I spent my modest budget on materials that turned out to be low quality…  You don't have to feel this way this year! I've got you covered. This guide is what I needed my first few years, it includes both economy (but still good quality) options as well as higher end products for those projects where you want to splurge. All of the listings are items that I have ordered for my classes over the years. I also included my favorite art reference books and classroom management books. So go and download your guide- and let me know how you like it over on instagram @artfulideasclassroom Wishing you a low stress back to school! First Day Tips for Art TeachersIt's August...have the teacher nightmares started yet? 15 years into my teaching career and I still have these, but if you are a new teacher there is light at the end of the tunnel because I have far less of them than I used to! They used to really rattle me, but now they are just a funny reminder that the school year is around the corner. Just the word Classroom Management makes my stress levels go up, the truth is I don't like being an authoritarian in my classroom- it is the art room for heaven's sake! But I have found over the years that it is true that the first few weeks of school do set the tone for the year so it is important to set up your classroom and procedures so the year goes smoothly! But it doesn't need to be complicated and you can easily set up a positive environment on the first day!  Tip 1: Greet the students at the doorI heard this in my teacher training and I wondered if it was necessary. I can now say that YES! This is the best tip I have, that is why it is #1. Greeting students at the door lets them know who is in charge of the class- YOU, that they are in the right place (sometimes students realize while you talk to them that they are in fact in the wrong room!), and that they cannot hide in the crowd in this class, that you want to know them and they are expected to participate. I suggest standing inside the room rather than in the hallway, let the students cross the threshold and be there to greet them. I like to have music softly playing in the background so they get the sense they are entering a different kind of class. I look them in the eye and say "Hi, What is your name?" If I can't understand them I ask them to repeat it, then I say "So nice to meet you _______, I'm Ms. S welcome to the class /or so glad you're here" then I give them a colored card (more on this in Tip 2) that matches their seating arrangement and tell them to get started on the assignment on the board (more on this in Tip 3). If there are returning students I greet them and ask them if they did anything artistic over the summer. It takes time, but this is important. A line will form at the door, but that is fine, don't let it make you rush, take time with each student. If a student is late, do not mention it on the first day, just greet them as you did the others (the first week is not the week to worry about tardies). Some students might try to sneak by you into the room (that has happened to me) but just approach them and ask them their name and follow the script. It might be awkward at first but most kids like being greeted and acknowledged by name right away in a class. Tip 2: Assign seats on the first dayHaving assigned seats signals to your students that you control the classroom environment, it lets them know that you will know where they are each day, and that you care about making the room environment predictable and safe. First week seating assignments are not written in stone, you can change them the following week or the following day if you need to. Also you can decide to ease up on assigned seating later in the year. You do not need an up to date roster to assign seats on the first day of school. All you need are colored index cards. Choose a color for each table in your classroom and simply tape down one of the cards onto the table with clear packing tape. Then count the seats at that table, that is how many cards of that color you will hand out on the first day of school. Then sort out the cards so that each color you pull from your stack when you greet students at the door is a different color. Friends typically walk in together so you can separate them right away--don't think of this as mean, I met my best friend in 8th grade because of assigned seating! It will help minimize disruptions the first week too. When students walk in greet them then hand them the card, tell them to find the table with that color card on it and to sit in any seat. It's that easy! Tip 3: Have an easy activity on the board when they walk inYou don't want students sitting there doing nothing while you greet incoming students and you also want to send the signal that in your class students will always be working. You can either write a list of questions on the board for students to answer about themselves on the card you gave them or you can have the list on a slide on the projector or SMART Board. I like to ask very simple questions that are not overly personal and a couple of silly questions like a "would you rather" or "what kind of animal would you transform into if you could be any animal" or "Is a hot dog a sandwich? Is cereal a soup? Explain your reasoning." I like to also include a fun non intimidating drawing prompt like "draw your mood as an emoji" or "create a decorative boarder around your card." I also ask what they are most excited to learn this year in art class. I also leave out blank copy paper and colorful markers and no.2 pencils in caddy on all the tables so they can sketch for fun. This is such a great way to get to know a little about them on Day 1 and you can use these cards as Equity Cards throughout the year for calling on students after they have had time to partner share and are given warning you will be using this strategy ( I never cold call on students, but after a partner share students will be ready to give a response). I also ask student to make a name tent out of copy paper to help me learn their names. Tip 4: Take the time for introductions!I introduce myself to my students but I keep it simple and focused on info that relates to the class. I like to share how to pronounce my name but I offer Ms.S as an option and most students call me this. I also share about my interests in art and how I will share them in upcoming lessons, where I went to school/taught before and what I studied I encourage upperclassmen to ask me about college if they are interested in studying art or education. I also share the WHY behind becoming a teacher and something fun like my love of matcha tea or aerial dance. I like to keep this very brief. I also include some related images on a slide to accompany this introduction. Then I ask the students to introduce themselves to the person seated next to them. I ask them to share their name, their answer to the silly question on the card and then to try to find one thing in common with each other. After they have time to share I ask if anyone found out something interesting they have in common with their partner and usually a few students are willing to share with the group. Tip 5: Do an easy fun art activityI like to do Handshake Drawings on the first day. This activity is simple and silly and only requires colored markers and copy paper. Students work in partners or a group of 3 and choose one marker to work with. They all hold on to the marker at the same time when they draw. Each student will think of an animal to draw but they won't tell their partner(s) they will begin drawing together with the one marker, it will be a bit of give and take as they draw. I like to say that like a handshake you can't be too aggressive (break your bones handshake) or too passive (dead fish handshake) but be alert and give and take in the process. Students will begin laughing immediately and the drawings come out quite cute! Ask students to name the creatures they created. As they work you can walk around and laugh right along with them. See a video of Handshake Drawing here. At the end of the activity have them stack up their name tents, cards and drawings and put them in a paper clip. That way you can sort through them to do attendance and add names to your seating chart. I like to pass back the name tents each day on the first week, it really helps me learn the names. Bonus Tip: Marking Chair PositionsI like to use Avery Round Labels to mark the floor underneath where I want the chairs to be for instruction (when looking at slideshows). This helps me not have to argue with students who move their chairs to face away from the board. It also gives students a cue that they are in the position to learn new info. During the studio work time I let them move the chairs but they must return them to the proper position (over the dot) before the end of class. My Favorite Classroom Management BookTools For Teaching: Discipline, Instruction, Motivation by Fred Jones is a must have especially for new teachers! I re-read chapters of this book every year and the illustrations are hilariously on point :)  My Favorite Products for Classroom Management:Avery Round Labels (seat marking)
Colored Index Cards (seating/equity) Chime (signal attention or mindfulness) Avery Removable Labels (for shelves) Expo Dry Erase Markers Magnetic 4pack Large Academic Desk Calendar (22-23) Uniball 207 Gel Pens 8 colors
Every molecule of my being was consumed by the job... At 23 I entered the classroom. I was beyond excited and I was clueless. I had some experience as a camp counselor, a TA in college, and of course as a student teacher but nothing can truly prepare you for the daily challenges of managing your own classroom. That first year I didn't know how to organize or deliver curriculum effectively, and I couldn't manage classroom disruptions very well. I thought about my students and classes constantly. I would go to art openings and dinner parties and talk about school incessantly and my husband had to hear about every detail of the day when I returned home in the evenings. The sheer number of decisions I had to make each day as a teacher left very little space for anything else in my mind or life. I don't want to paint a dismal picture, there were many great moments that first year. I bonded with my colleagues in the Art Department early on (two teachers in with 20+ years experience) and we had a lot of laughs together (the kind where you can't even catch your breath...the best kind of laugher.) I also took a lot of creative risks that year, I didn't know what worked so I just tried any idea I could come up with. Some of these were literally a hot mess that I had to stay late into the evening to clean up, but some became, over time, the tried and true lessons I teach every year. This was the early years of Pinterest and that site became a life raft keeping me afloat with lesson and project ideas. That first year my students did SO MANY projects. I felt like I never had enough material and my nightmares were haunted by a student saying "I'M DONE!" This was because although Pinterest provided me ideas, I didn't know how to extend those ideas into deep, content rich curriculum. I definitely did not have the time or head space to do this. How can I free up more creative space for art educators? Thankfully that first year is now in the rearview mirror, and so are 14 more years. In the stretch between my first year and now I have surprised myself with how my creative interests have shifted. I became a teacher because I was passionate about art. I've stayed a teacher because now I am passionate about teaching. As much as I enjoy printmaking (my first art love) and gif art (my current obsession), it is curriculum design that is my true passion these days. I love the test kitchen of the classroom, the unanticipated ingredients and getting to witness the moment when it all comes together for a student and they begin to see their own creative potential. This is why I created Artful Ideas. I'm here to help teachers free up S P A C E. The space that took me years to carve out for myself. Even as a now "veteran" teacher (I still can't believe it) I still face challenges every year. As teachers we are called on to teach brand new classes with little lead time or to advise a club or activity we know almost noting about. Artful Ideas is all about sharing what I am most passionate about: curriculum design. I'm here to provide art teacher tips and relevant content rich curriculum (lessons and activities) so that you have more time to focus on what matters to you most in and out of the classroom. One thing I learned is as a teacher if you do something one year, you have to do it every year so choose wisely! :) Here are some of my favorite art teacher costumes over the years...
Curriculum Design and Progression for Foundations Digital ArtIn 2020 I relocated to a new state and began teaching at a new school. I was asked to teach Digital Art for the first time in my career. Although I have been using digital tools (Photoshop/Illustrator) for 20 years in my own artwork I had only ever worked with students individually on digital skill building because my school did not have access to a digital lab or Creative Cloud. I was so excited to create a new project based curriculum to guide students through the basic and advanced tools these programs offer for photo manipulation, illustration and even animation. The progression of the curriculum leads students through projects that build on one another and offer the opportunity to revisit skills so that they can build an understand of the program and memorize the menus, panels and tools. Students are given a Wacom tablet and stylus and are encouraged to use them over a mouse or trackpad. The projects themselves are inspired by current trends in digital design and contemporary digital artists. Teaching students to manage their workflow and to problem solve on their own and with others is also a cornerstone to this curriculum. Visual Autobiography ProjectThe first project, Visual Autobiography introduces a variety of basic skills, keyboard shortcuts and tools. It is also a great way for students to introduce themselves to the class and for me to get to know the students' interests. The skills covered in this lesson include:
Digital Surreal CollageIn our second project Digital Surreal Collage we revisit many of the tools and techniques we learned in the first project but build upon that foundation to explore more tools including: dodge/burn, blur tool, clone stamp, and adjustment layers. I begin the lesson by teaching a bit about the history of surrealism and the strategies employed by surrealist artists. We look at several examples from Art History and contemporary artists. The goal of the project is to employ these strategies to create a visually intriguing and thought provoking composition. Surreal Strategies:
The video tutorials for this lesson build on the skills learned in the Visual Autobiography project and focus on photo manipulation, managing selections and adjustment layers. Line ArtThe third lesson I teach focuses on building skill and precision using the tablet and stylus as well as an understanding of line weight, gestural line, brush tools, symmetry tools, color picker/libraries and paint bucket tool. Students work through drills to work on precision and control. Then students create a portfolio of line art drawings including a continuous line drawing, a symmetrical drawing and a line drawing of their choice or "free choice" drawing. |
AuthorI'm a high school/middle school art teacher with 16 years of experience. I'm here to help art teachers free up more time and space in their lives through lesson ideas and ready to go content rich, engaging curriculum. Categories
|


 RSS Feed
